Quantcast
Channel: Red Hat JBoss Enterprise Application Platform – Red Hat Developer
Viewing all 64 articles
Browse latest View live

How to start multiple Artemis brokers inside Red Hat JBoss EAP-7 container in Master/Slave fashion

$
0
0

To be as simple as possible, we will walk through a stand-alone use-case.

Usually, when we require having messaging features in our stand-alone environment, we use full profile for EAP container.

If we have a requirement with clustering functionalities then we prefer to have HA profile but if clustering and messaging both are required then we go for a full-HA profile.

By default with a full/full-HA profile, EAP-7 container provides us the default configuration for the embedded Artemis Broker with default configuration. But, in certain scenarios, people might have a requirement for the additional broker inside the same EAP-7 container. In such cases, I recommend having separate connector mapping for additional Artemis Broker.

First, create the socket-binding entry inside the socket-binding-group for an additional Artemis broker:

<socket-binding name="http-2" port="${jboss.http.port:8180}" />

Here, I am creating http-2 as socket-binding for additional Artemis. Artemis uses http port 8080 for communication by default. However, it will be occupied when we will start our EAP-7 server hence to avoid conflict, I added an additional socket for the second instance of Artemis in a container.

Next, is to rename the existing default Artemis server/broker to identify between multiple instances. I am trying to set up master-slave topology and hence I am setting up server name as ‘master’.

<server name="master">

Then I copy the same server and pasted inside messaging subsystem with a name as a backup.

<server name="backup">

<security-setting name="#">

<role name="guest" send="true" consume="true" create-non-durable-queue="true" delete-non-durable-queue="true"/>

</security-setting>

<address-setting name="#" dead-letter-address="jms.queue.DLQ" expiry-address="jms.queue.ExpiryQueue" max-size-bytes="10485760" page-size-bytes="2097152" message-counter-history-day-limit="10"/>

<http-connector name="http-connector-2" socket-binding="http-2" endpoint="http-acceptor-2"/>

<http-connector name="http-connector-throughput-2" socket-binding="http" endpoint="http-acceptor-throughput-2">

<param name="batch-delay" value="50"/>

</http-connector>

<in-vm-connector name="in-vm" server-id="1"/>

<http-acceptor name="http-acceptor-2" http-listener="default"/>

<http-acceptor name="http-acceptor-throughput-2" http-listener="default">

<param name="batch-delay" value="50"/>

<param name="direct-deliver" value="false"/>

</http-acceptor>

<in-vm-acceptor name="in-vm" server-id="1"/>

<jms-queue name="ExpiryQueue-2" entries="java:/jms/queue/ExpiryQueue-2"/>

<jms-queue name="DLQ-2" entries="java:/jms/queue/DLQ-2"/>

<connection-factory name="InVmConnectionFactory-2" connectors="in-vm" entries="java:/ConnectionFactory-2"/>

<connection-factory name="RemoteConnectionFactory-2" connectors="http-connector-2" entries="java:jboss/exported/jms/RemoteConnectionFactory-2"/>

<pooled-connection-factory name="activemq-ra-2" transaction="xa" connectors="in-vm" entries="java:/JmsXA-2 java:jboss/DefaultJMSConnectionFactory-2"/>

</server>

After this step, I thought to have a master and execute below command to make both the brokers in master-slave fashion:

$ /subsystem=messaging-activemq/server=master/ha-policy=shared-store-master:add(failover-on-server-shutdown=true)

$ /subsystem=messaging-activemq/server=backup/ha-policy=shared-store-slave:add(allow-failback=true,restart-backup=true,failover-on-server-shutdown=true)

The entire configuration of the messaging subsystem is as below:

<subsystem xmlns="urn:jboss:domain:messaging-activemq:1.0">
 <server name="master">
 <shared-store-master failover-on-server-shutdown="true"/>
 <security-setting name="#">
 <role name="guest" delete-non-durable-queue="true" create-non-durable-queue="true" consume="true" send="true"/>
 </security-setting>
 <address-setting name="#" message-counter-history-day-limit="10" page-size-bytes="2097152" max-size-bytes="10485760" expiry-address="jms.queue.ExpiryQueue" dead-letter-address="jms.queue.DLQ"/>
 <http-connector name="http-connector" endpoint="http-acceptor" socket-binding="http"/>
 <http-connector name="http-connector-throughput" endpoint="http-acceptor-throughput" socket-binding="http">
 <param name="batch-delay" value="50"/>
 </http-connector>
 <in-vm-connector name="in-vm" server-id="0"/>
 <http-acceptor name="http-acceptor" http-listener="default"/>
 <http-acceptor name="http-acceptor-throughput" http-listener="default">
 <param name="batch-delay" value="50"/>
 <param name="direct-deliver" value="false"/>
 </http-acceptor>
 <in-vm-acceptor name="in-vm" server-id="0"/>
 <jms-queue name="ExpiryQueue" entries="java:/jms/queue/ExpiryQueue"/>
 <jms-queue name="myQueue" entries="java:/jms/queue/myQueue"/>
 <jms-queue name="DLQ" entries="java:/jms/queue/DLQ"/>
 <connection-factory name="InVmConnectionFactory" entries="java:/ConnectionFactory" connectors="in-vm"/>
 <connection-factory name="RemoteConnectionFactory" entries="java:jboss/exported/jms/RemoteConnectionFactory" connectors="http-connector"/>
 <pooled-connection-factory name="activemq-ra" transaction="xa" entries="java:/JmsXA java:jboss/DefaultJMSConnectionFactory" connectors="in-vm"/>
 </server>
 <server name="backup">
 <shared-store-slave failover-on-server-shutdown="true"/>
 <security-setting name="#">
 <role name="guest" delete-non-durable-queue="true" create-non-durable-queue="true" consume="true" send="true"/>
 </security-setting>
 <address-setting name="#" message-counter-history-day-limit="10" page-size-bytes="2097152" max-size-bytes="10485760" expiry-address="jms.queue.ExpiryQueue" dead-letter-address="jms.queue.DLQ"/>
 <http-connector name="http-connector-2" endpoint="http-acceptor-2" socket-binding="http-2"/>
 <http-connector name="http-connector-throughput-2" endpoint="http-acceptor-throughput-2" socket-binding="http-2">
 <param name="batch-delay" value="50"/>
 </http-connector>
 <in-vm-connector name="in-vm" server-id="1"/>
 <http-acceptor name="http-acceptor-2" http-listener="default"/>
 <http-acceptor name="http-acceptor-throughput-2" http-listener="default">
 <param name="batch-delay" value="50"/>
 <param name="direct-deliver" value="false"/>
 </http-acceptor>
 <in-vm-acceptor name="in-vm" server-id="1"/>
 <jms-queue name="ExpiryQueue-2" entries="java:/jms/queue/ExpiryQueue-2"/>
 <jms-queue name="myQueue" entries="java:/jms/queue/myQueue2"/>
 <jms-queue name="DLQ-2" entries="java:/jms/queue/DLQ-2"/>
 <connection-factory name="InVmConnectionFactory-2" entries="java:/ConnectionFactory-2" connectors="in-vm"/>
 <connection-factory name="RemoteConnectionFactory-2" entries="java:jboss/exported/jms/RemoteConnectionFactory-2" connectors="http-connector-2"/>
 <pooled-connection-factory name="activemq-ra-2" transaction="xa" entries="java:/JmsXA-2 java:jboss/DefaultJMSConnectionFactory-2" connectors="in-vm"/>
 </server>
 </subsystem>

Save the configuration file and start the Red Hat JBoss EAP-7 server.


Click here and quickly get started with the JBoss EAP download.

Share

The post How to start multiple Artemis brokers inside Red Hat JBoss EAP-7 container in Master/Slave fashion appeared first on RHD Blog.


Announcing Red Hat Developer Studio 11.1.0.GA and JBoss Tools 4.5.1.Final for Eclipse Oxygen.1A

$
0
0

JBoss Tools 4.5.1 and Red Hat JBoss Developer Studio 11.1 for Eclipse Oxygen.1A are here waiting for you. Check it out!

Installation

JBoss Developer Studio comes with everything pre-bundled in its installer. Simply download it from our JBoss Products page and run it like this:

java -jar jboss-devstudio-<installername>.jar

JBoss Tools or Bring-Your-Own-Eclipse (BYOE) JBoss Developer Studio requires a bit more:

This release requires at least Eclipse 4.7 (Oxygen) but we recommend using the latest Eclipse 4.7.1A Oxygen JEE Bundle since then you get most of the dependencies pre-installed.

Once you have installed Eclipse, you can either find us on the Eclipse Marketplace under “JBoss Tools” or “Red Hat JBoss Developer Studio”.

For JBoss Tools, you can also use our update site directly.

http://download.jboss.org/jbosstools/oxygen/stable/updates/

What is new?

Our focus for this release was on adoption of Java 9, improvements for container-based development and bug fixing. Eclipse Oxygen itself has a lot of new cool stuff but let me highlight just a few updates in both Eclipse Oxygen and JBoss Tools plugins that I think are worth mentioning.

OpenShift 3

CDK 3.2 Server Adapter

A new server adapter has been added to support the next generation of CDK 3.2. While the server adapter itself has limited functionality, it is able to start and stop the CDK virtual machine via its minishift binary. Simply hit Ctrl+3 (Cmd+3 on OSX) and type CDK, which will bring up a command to set up and/or launch the CDK server adapter. You should see the old CDK 2 server adapter along with the new CDK 3 one (labeled Red Hat Container Development Kit 3.2+).

All you have to do is set the credentials for your Red Hat account, the location of the CDK’s minishift binary file, the type of virtualization hypervisor and an optional CDK profile name.

Once you’re finished, a new CDK Server adapter will then be created and visible in the Servers view.

Once the server is started, Docker and OpenShift connections should appear in their respective views, allowing the user to quickly create a new Openshift application and begin developing their AwesomeApp in a highly replicable environment.

New command to tune resource limits

A new command has been added to tune resource limits (CPU, memory) on an OpenShift deployment. It’s available for a Service, a DeploymentConfig, a ReplicationController, or a Pod.

To activate it, go the OpenShift explorer, select the OpenShift resource, right-click, and select Edit resource limits. The following dialog will show up:

After you changed the resource limits for this deployment, it will be updated and new pods will be generated (not for ReplicationController).

Discover Docker registry URL for OpenShift connections

When an OpenShift connection is created, the Docker registry URL is empty. When the CDK is started through the CDK server adapter, an OpenShift connection is created or updated if a matching OpenShift connection is found. But what if you have several OpenShift connections, the remaining ones will be left with the empty URL.

You can find the matching Docker registry URL when editing the OpenShift connection through the Discover button:

Click on the Discover button and the Docker registry URL will be filled if a matching CDK server adapter is found:

OpenShift.io login

It is possible to login from JBoss Tools to OpenShift.io. A single account will be maintained per workspace. Once you initially logged onto OpenShift.io, all needed account information (tokens…) will be stored securely.

There are two ways to login into OpenShift.io:

  • through the UI
  • via a third-party service that will invoke the proper extension point
UI based login to OpenShift.io

In the toolbar, you should see a new icon . Click on it and it will launch the login.

If this is your first time logging in to OpenShift.io or if your OpenShift.io account tokens are not valid anymore, you should see a browser launched with the following content:

Enter your RHDP login and the browser will then auto-close and an extract (for security reasons) of the OpenShift.io token will be displayed:

This dialog will be also shown if an OpenShift.io account was configured in the workspace and the account information is valid.

Via extension point

The OpenShift.io integration can be invoked by a third-party service through the org.jboss.tools.openshift.io.code.tokenProvider extension point. This extension point will perform the same actions as the UI but will return an access token for OpenShift.io to the third-party service. A detailed explanation of how to use this extension point is described here: Wiki page

You can display the account information using the Eclipse Jboss Tools → OpenShift.io preference node. If your workspace does not contain an OpenShift.io account yet, you should see the following:

If you have a configured OpenShift.io account, you should see this:

Server tools

EAP 7.1 Server Adapter

A server adapter has been added to work with EAP 7.1 and WildFly 11. It’s based on WildFly 11. This new server adapter includes support for incremental management deployment like it’s upstream WildFly 11 counterpart.

Fuse Tooling

Global Beans: improve support for Bean references

It is now possible to set Bean references from User Interface when creating a new Bean:

Editing Bean references is also now available in the properties view when editing an existing Bean:

Additional validation has been added to help users avoid mixing Beans defined with class names and Beans defined referring to other beans.

Apache Karaf 4.x Server Adapter

We are happy to announce the addition of new Apache Karaf server adapters. You can now download and install Apache Karaf 4.0 and 4.1 from within your development environment.

Switch Apache Camel Version

You can now change the Apache Camel version used in your project. To do that you need to cite the context menu of the project in the project explorer and navigate to the Configure menu. There you will find the menu entry called Change Camel Version, which will guide you through this process.

Improved Validation

The validation in the editor has been improved to find containers, which lack mandatory child elements. (for instance a Choice without a child element)


And more…

You can find more updates that are noteworthy on this page.

What is next?

With JBoss Tools 4.5.1 and Developer Studio 11.1 released we are already working on the next maintenance release for Eclipse Oxygen.

Share

The post Announcing Red Hat Developer Studio 11.1.0.GA and JBoss Tools 4.5.1.Final for Eclipse Oxygen.1A appeared first on RHD Blog.

Dynamically Creating Java Keystores in OpenShift

$
0
0

Introduction

With a simple annotation to a service, you can dynamically create certificates in OpenShift.

Certificates created this way are in PEM (base64-encoded certificates) format and cannot be directly consumed by Java applications, which need certificates to be stored in Java KeyStores.

In this post, we are going to show a simple approach to enable Java applications to benefit from certificates dynamically created by OpenShift.

Why certificates

Certificates are part of a PKI infrastructure and can be used to authenticate and secure (encrypt) network communications.

OpenShift has an internal Certificate Authority (CA) that it can use to generate new certificates.

Some applications have a requirement that all communications must be encrypted, even when inside the OpenShift cluster (for example, PCI in-scope communications usually have this requirement).

Typically, in OpenShift, this use case is split into two scenarios:

  1. Inbound communication from outside the cluster.
  2. Communication between two pods running inside the cluster.

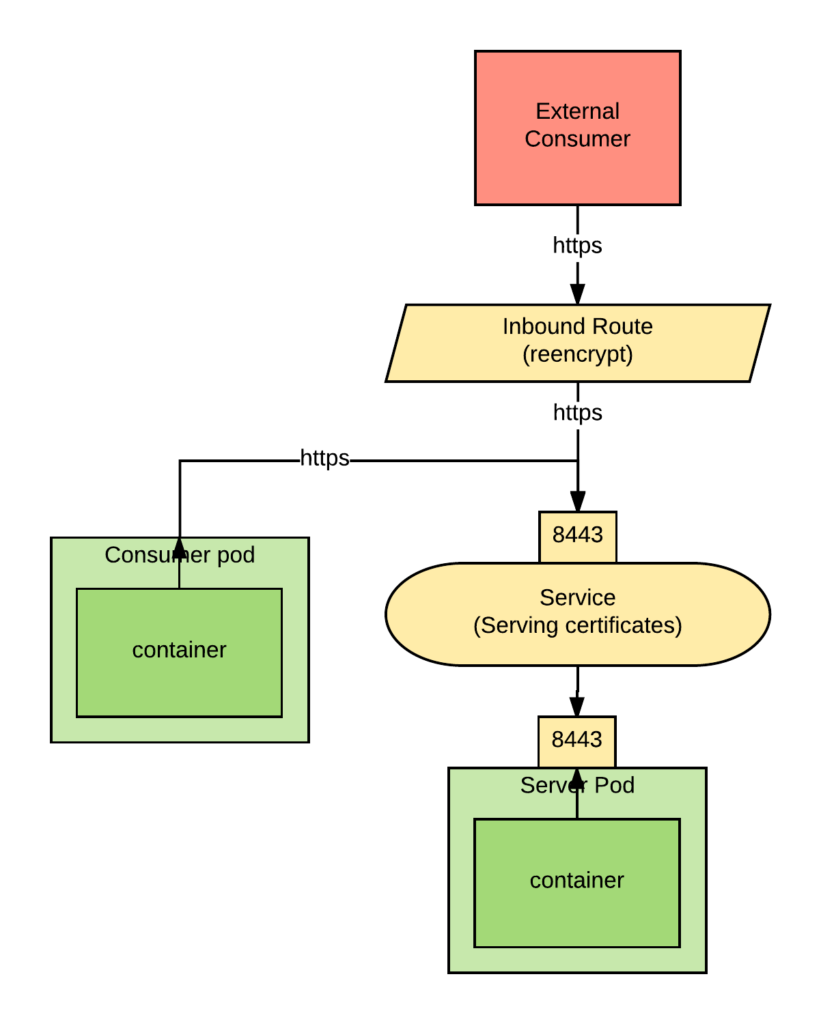
The below picture shows the two use cases:

For the route, we have chosen reencrypt so that we can use the same certificate in the server component to serve both internal and external requests and still use the OpenShift-provided automation.

If your application needs to expose its certificates directly to inbound connections then you will have to use passthrough. In this scenario, you use the ability to use the OpenShift automation.

Using this annotation in the service in front of our server pod we can have OpenShift generate certificates representing the service FQDN and put them in a secret:

service.alpha.openshift.io/serving-cert-secret-name: service-certs

Also, both the router and the consuming pod need to be able to trust the dynamically generated certificates. The route by default will trust any certificates created by the OpenShift. And for the consuming service, we can use the service account CA bundle to trust the generated certificates.

The service account CA bundle can be always be found here:

/var/run/secrets/kubernetes.io/serviceaccount/service-ca.crt

Unfortunately, Java applications cannot consume certificates in PEM format directly, we have to first turn them into Java Keystores.

Consuming Dynamically-Generated Certificates from Java Applications

To convert certificates in PEM format to Java KeyStores, we are going to use an init container.

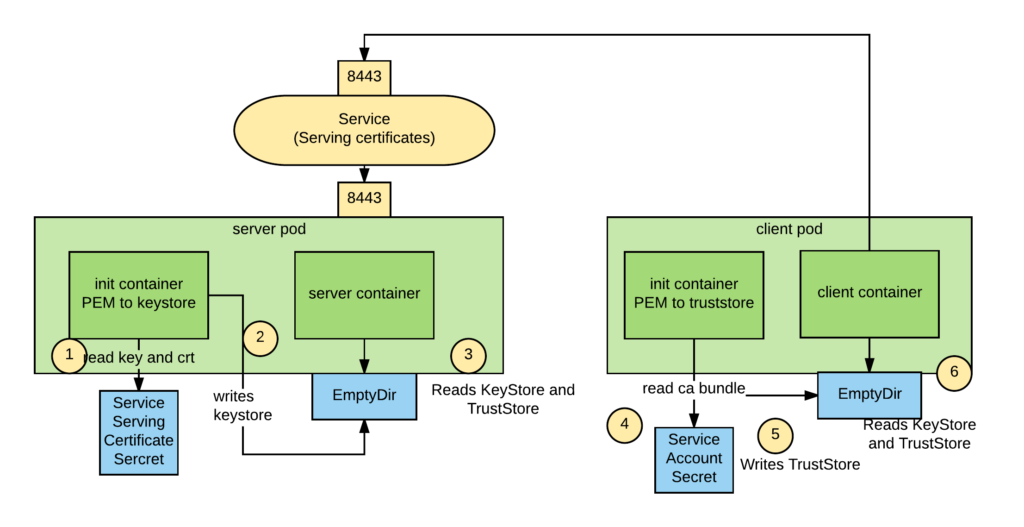
The architecture and sequence of events are shown in the following picture:

We use an emptyDir volume to store the keystore and truststore files so that our application container can eventually read them.

The sequence of commands to convert a PEM-formatted certificate and private key is the following:

openssl pkcs12 -export -inkey $keyfile -in $crtfile -out $keystore.pkcs12 -password pass:$password
keytool -importkeystore -noprompt -srckeystore $keystore.pkcs12 -srcstoretype pkcs12 -destkeystore $keystore.jks -storepass $password -srcstorepass $password

Where:

  • $keyfile is the key file.
  • $crtfile is the certificate file.
  • $keystore_jks is the keystore file that will be created.
  • $password is the password to the keystore.
  • $keystore_pkcs12 is a pkcs12-formatted keystore file that is created in the process.

Our init container will look as follows:

  initContainers:
  - name: pem-to-keystore
  image: registry.access.redhat.com/redhat-sso-7/sso71-openshift:1.1-16
  env:
    - name: keyfile
      value: /var/run/secrets/openshift.io/services_serving_certs/tls.key
    - name: crtfile
      value: /var/run/secrets/openshift.io/services_serving_certs/tls.crt
    - name: keystore_pkcs12
      value: /var/run/secrets/java.io/keystores/keystore.pkcs12
    - name: keystore_jks
      value: /var/run/secrets/java.io/keystores/keystore.jks
    - name: password
      value: changeit    
  command: ['/bin/bash']
  args: ['-c', "openssl pkcs12 -export -inkey $keyfile -in $crtfile -out $keystore_pkcs12 -password pass:$password && keytool -importkeystore -noprompt -srckeystore $keystore_pkcs12 -srcstoretype pkcs12 -destkeystore $keystore_jks -storepass $password -srcstorepass $password"]
  volumeMounts:
    - name: keystore-volume
      mountPath: /var/run/secrets/java.io/keystores
    - name: service-certs
      mountPath: /var/run/secrets/openshift.io/services_serving_certs   
volumes:
  - name: keystore-volume
    emptyDir: {}
  - name: service-certs
    secret:
      secretName: service-certs 

The command to create a Java Truststore starting from a CA bundle is the following:

csplit -z -f crt- service-ca.crt '/-----BEGIN CERTIFICATE-----/' '{*}'
for file in crt-*; do keytool -import -noprompt -keystore truststore.jks -file $file -storepass changeit -alias service-$file; done

Where:

  • $truststore_jks is the CA bundle file.
  • $ca_bundle is the generated truststore file.
  • $password is the password to the truststore file.

The loop is needed because of keytool imports only one certificate at a time.

Our init container will look as follows:

initContainers:
- name: pem-to-truststore
  image: registry.access.redhat.com/redhat-sso-7/sso71-openshift:1.1-16
  env:
    - name: ca_bundle
      value: /var/run/secrets/kubernetes.io/serviceaccount/service-ca.crt
    - name: truststore_jks
      value: /var/run/secrets/java.io/keystores/truststore.jks
    - name: password
      value: changeit    
  command: ['/bin/bash']
  args: ['-c', "csplit -z -f crt- $ca_bundle '/-----BEGIN CERTIFICATE-----/' '{*}' && for file in crt-*; do keytool -import -noprompt -keystore $truststore_jks -file $file -storepass changeit -alias service-$file; done"]
  volumeMounts:
    - name: keystore-volume
      mountPath: /var/run/secrets/java.io/keystores  
volumes:
  - name: keystore-volume
    emptyDir: {}            

Note: For this example, we are using the Red Hat Single Sign-On image (version 1.1-16). This image happens to have onboard both openssl and keytool, which are the two tools that we need here. Also, RHSSO is included in any openshift subscription. You can obviously create your own image.

End-to-End SpringBoot Demo

To prove out this approach, we created a secure SpringBoot server and client that connect to it over SSL.

SSL Server

For the server, its service object will need the serving-cert-secret-name annotation to create its certificate and deployment will use the “pem-to-keystore” initContainer to create the server’s keystore from the generated certificates. Below are the service, deployment config, and route definitions:

- apiVersion: v1
  kind: Service
  metadata:
    annotations:
      service.alpha.openshift.io/serving-cert-secret-name: service-certs
    labels:
      app: ssl-server
    name: ssl-server
  spec:
    ports:
    - name: 8443-tcp
      port: 8443
      protocol: TCP
      targetPort: 8443
    selector:
      deploymentconfig: ssl-server
- apiVersion: v1
  kind: DeploymentConfig
  metadata:
    labels:
      app: ssl-server
    name: ssl-server
  spec:
    replicas: 1
    selector:
      deploymentconfig: ssl-server
    template:
      metadata:
        labels:
          app: ssl-server
          deploymentconfig: ssl-server
      spec:
        containers:
        - name: ssl-server
          image: ssl-server
          env:
          - name: keystore_jks
            value: /var/run/secrets/java.io/keystores/keystore.jks
          - name: password
            value: changeit
          ports:
          - containerPort: 8443
            protocol: TCP
          resources: {}
          volumeMounts:
          - mountPath: /var/run/secrets/java.io/keystores
            name: keystore-volume
        initContainers:
        - name: pem-to-keystore
          image: registry.access.redhat.com/redhat-sso-7/sso71-openshift:1.1-16
          env:
          - name: keyfile
            value: /var/run/secrets/openshift.io/services_serving_certs/tls.key
          - name: crtfile
            value: /var/run/secrets/openshift.io/services_serving_certs/tls.crt
          - name: keystore_pkcs12
            value: /var/run/secrets/java.io/keystores/keystore.pkcs12
          - name: keystore_jks
            value: /var/run/secrets/java.io/keystores/keystore.jks
          - name: password
            value: changeit
          command: ['/bin/bash']
          args: ['-c', "openssl pkcs12 -export -inkey $keyfile -in $crtfile -out $keystore_pkcs12 -password pass:$password && keytool -importkeystore -noprompt -srckeystore $keystore_pkcs12 -srcstoretype pkcs12 -destkeystore $keystore_jks -storepass $password -srcstorepass $password"]
          volumeMounts:
          - mountPath: /var/run/secrets/java.io/keystores
            name: keystore-volume
          - mountPath: /var/run/secrets/openshift.io/services_serving_certs
            name: service-certs
        volumes:
        - name: keystore-volume
          emptyDir: {}
        - name: service-certs
          secret:
            secretName: service-certs
- apiVersion: v1
  kind: Route
  metadata:
    labels:
      app: ssl-server
    name: ssl-server
  spec:
    port:
      targetPort: 8443-tcp
    tls:
      termination: reencrypt
    to:
      kind: Service
      name: ssl-server
      weight: 100
    wildcardPolicy: None

We pass the keystore_jks and password values as environment variables to the app container and then in the SpringBoot application.properties file have:

server.port=8443
server.ssl.key-password=${password}
server.ssl.key-store=${keystore_jks}
server.ssl.key-store-provider=SUN
server.ssl.key-store-type=JKS 

Read about configuring SSL in the SpringBoot Docs. The app has a simple /secured endpoint exposed via:

@RestController
class SecuredServerController {    
    @RequestMapping("/secured")
    public String secured(){
 System.out.println("Inside secured()");
 return "Hello user !!! : " + new Date();
    }
}

To start the server run:

oc new-project ssl-demo
oc process -f https://raw.githubusercontent.com/domenicbove/openshift-ssl-server/master/template.yaml | oc create -f -

This will trigger a build and eventual deployment of the service. You can test the external route by appending /secured to the route hostname automatically generated.

SSL Client

Now for the client to make a secure connection to the server, it will need the trust store generated by the “pem-to-truststore” initContainer. Here is the client’s app deployment config:

- apiVersion: v1
  kind: DeploymentConfig
  metadata:
    labels:
      app: ssl-client
    name: ssl-client
  spec:
    replicas: 1
    selector:
      deploymentconfig: ssl-client
    template:
      metadata:
        labels:
          app: ssl-client
          deploymentconfig: ssl-client
      spec:
        containers:
        - name: ssl-client
          image: ssl-client
          imagePullPolicy: Always
          env:
          - name: JAVA_OPTIONS
            Value: -Djavax.net.ssl.trustStore=/var/run/secrets/java.io/keystores/truststore.jks -Djavax.net.ssl.trustStorePassword=changeit
          - name: POD_NAMESPACE
            valueFrom:
              fieldRef:
                apiVersion: v1
                fieldPath: metadata.namespace
          volumeMounts:
          - mountPath: /var/run/secrets/java.io/keystores
            name: keystore-volume
        initContainers:
        - name: pem-to-truststore
          image: registry.access.redhat.com/redhat-sso-7/sso71-openshift:1.1-16
          env:
          - name: ca_bundle
            value: /var/run/secrets/kubernetes.io/serviceaccount/service-ca.crt
          - name: truststore_jks
            value: /var/run/secrets/java.io/keystores/truststore.jks
          - name: password
            value: changeit
          command: ['/bin/bash']
          args: ['-c', "csplit -z -f crt- $ca_bundle '/-----BEGIN CERTIFICATE-----/' '{*}' && for file in crt-*; do keytool -import -noprompt -keystore $truststore_jks -file $file -storepass changeit -alias service-$file; done"]
          volumeMounts:
          - mountPath: /var/run/secrets/java.io/keystores
            name: keystore-volume
        volumes:
        - emtpyDir: {}
          name: keystore-volume

You’ll note that we leveraged the JAVA_OPTIONS environment variable available on the openjdk18-openshift image to add the truststore file path and password to the image’s startup Java command.

All the client source code has are repeated calls to the server at https://ssl-client.<namespace>.svc:8443/secured

public static void main(String[] args) throws IOException, InterruptedException {
  HttpClient client = new HttpClient();
  GetMethod method = new GetMethod();
  String uri = "https://ssl-server." + System.getenv("POD_NAMESPACE") + ".svc:8443/secured";
  method.setURI(new URI(uri, false));
  while(true) {
    client.executeMethod(method);
    Thread.sleep(5000);
  }
}

To run the client app in OpenShift:

oc process -f https://raw.githubusercontent.com/domenicbove/openshift-ssl-client/master/template.yaml | oc create -f -

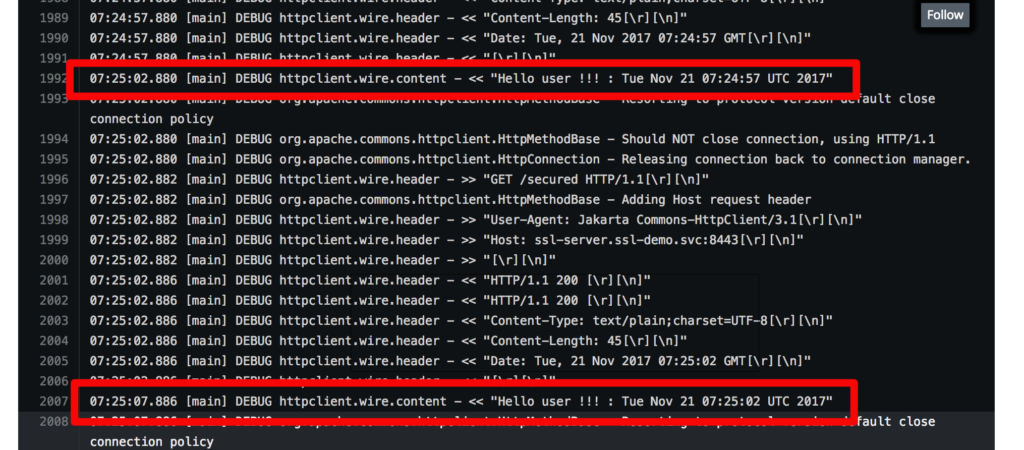
This will trigger an automatic build and deployment in your project. When the app is deployed, click on the pod logs and you should see the response from the SSL server:

Additional Findings

If your client needs the default Java CA certs as well as the CA bundle found in the pod, use this arg in the “pem-to-truststore” initContainer.

args: ['-c', "keytool -importkeystore -srckeystore $JAVA_HOME/jre/lib/security/cacerts -srcstoretype JKS -destkeystore $truststore_jks -storepass changeit -srcstorepass changeit && csplit -z -f crt- $ca_bundle '/-----BEGIN CERTIFICATE-----/' '{*}' && for file in crt-*; do keytool -import -noprompt -keystore $truststore_jks -file $file -storepass changeit -alias service-$file; done"]

Troubleshooting

It may be the case when working with service serving certificate secrets that you find an error annotation on the service. This means that the secret to being generated already exists. You simply need to delete the secret and recreate the service. Read the Troubleshooting Guide here.

Conclusions

This post showed a simple approach, based on init container, that allows Java applications to take advantage of OpenShift dynamically generated certificates.

Looking at Kubernetes (one of the OpenShift upstream projects) it looks like that in the future the ability of openshift to generate certificates will be improved by allowing to plugin external CAs. So, think this is a good time to start leveraging this feature also for Java applications.


To build your Java EE Microservice visit WildFly Swarm and download the cheat sheet.

Share

The post Dynamically Creating Java Keystores in OpenShift appeared first on RHD Blog.

The State of Microservices Survey 2017 – Eight trends you need to know

$
0
0

During the fall of 2017, we conducted a microservices survey with our Red Hat Middleware and Red Hat OpenShift customers. Here are eight interesting trends discerned by the results:

I. Microservices are being used to re-architect existing applications as much as for brand new projects

There seems to be a strong emphasis in the market by technology vendors for positioning microservices as being only for new projects.  However, our survey reveals that organizations are also using microservices to re-architect existing and legacy applications.

Sixty-seven percent of Red Hat Middleware customers and 79 percent of Red Hat OpenShift customers indicated this. This data tells us that microservices offer value to users all along their IT transformation journey — whether they are just looking to update their current application portfolio or are gearing up new initiatives. So, if you are only focused on greenfield projects for microservices, it may be a good idea to also start evaluating your existing applications for a microservice re-architecture analysis. Microservices introduce a set of benefits that our customers have already started seeing, and they are applying these benefits not just to new projects but to existing ones as well.

II. Customers prefer a multi-runtime/multi-technology/multi-framework approach for microservices

There is no single runtime, platform or framework that is the best for microservices. Customers are using the “right tool for the right task” and are not marrying themselves to a single technology, runtime or framework for microservices. In fact, 44 percent of Red Hat Middleware customers and 50 percent of Red Hat OpenShift customers believe in “using the right tool for the right task.”

In addition, eighty-seven percent of respondents indicated that they are using or considering multiple technologies for developing microservices.

So, if you are using a single runtime, technology or framework for microservice development, it may be wise to start looking at other runtimes, technologies and frameworks and select the one that is the best fit for the problem you are trying to solve. In other words, now is a good time to expand your single-technology approach to a multi-technology one.

III. Top six benefits delivered by microservices

Respondents identified many benefits that they were already receiving. The top six are:

  1. Continuous Integration (CI) / Continuous Deployment (CD)
  2. Agility
  3. Improved scalability
  4. Faster time-to-market
  5. Higher developer productivity
  6. Easier debugging and maintenance

If you are hesitant about using microservices for new projects or re-architecting existing applications, wait no more. These benefits were the highest ranked by users and most importantly, these are benefits that are already being enjoyed from using microservices.

IV. Microservice benefits can be realized within two to 12 months

Thirty-three percent of respondents indicated that they realized benefits of microservices within two to six months and 34 percent of respondents within six to 12 months.

As shown by the survey results, customers can start reaping the benefits of microservices fairly fast. In order to stay competitive, there is no reason to stay on the sidelines when it comes to microservices.

V. Top four challenges when implementing microservices

Implementing microservices is not a panacea for all your problems. They come with their own challenges. The top four challenges that Red Hat respondents identified were:

  1. Corporate culture and organizational challenges
  2. Microservices management
  3. Diagnostics and monitoring
  4. Time and resources

Microservices development requires a shift in how software is developed. This can present a challenge for organizations that prefer the status-quo because they are familiar with current processes and procedures. Also, having to learn new runtimes, technologies, or frameworks may be challenging in organizations that do not want to invest in re-training their workforce in a technology that is different to their expertise. If re-training is not an option, finding resources in the market with the right experience and background on selected microservices technologies may be a challenge. Lastly, there are two technical challenges to microservices: Microservices management and Diagnostics and Monitoring. You should assess available solutions in the market that provide functionality to address these technical challenges. Microservices solutions are constantly evolving and adding functionality based on many of the latest innovative open source technologies.

VI. Top four activities to overcome challenges

Organizations are carrying out activities to address the challenges seen when implementing microservices. The top four activities that respondents identified to mitigate these challenges were:

  1. Developing/implementing in-house microservices tooling
  2. Re-organization
  3. Working with vendor Subject Matter Experts / Using a vendor as a trusted advisor
  4. Purchasing or using a microservices platform / solution

Respondents indicated that they have been relying on vendors and vendor SMEs as their trusted advisors when it comes to microservices. In addition, many responded that a reorganization was a mitigating activity to get past the microservices challenges in relation to corporate culture. So, evaluate microservices solutions in the market and select the one that fits your requirements the best. If there are any gaps in the solution, implement those gaps in-house. Rely on vendors for guidance in adapting and implementing microservices. To spark change from your organization’s established processes, you may need to re-organize teams. Often times, introducing cultural change and reorganization is best done through an experiential approach via a labs-style engagement.

VII. An application server can be used for microservices

Along with technologies like Docker and Kubernetes, which illustrate the success of containers as a technology on which to implement microservices, 52 percent of Red Hat Middleware respondents are either using or considering Red Hat JBoss Enterprise Application Platform (JBoss EAP) for microservices.

As mentioned earlier, organizations are not applying microservices just for new projects but also for existing applications, many of which are written in Java EE using traditional application servers. But not all application servers are created equal. Many application servers in the market have not been modernized or re-designed to sustain the demands of cloud-native development. Red Hat JBoss Enterprise Application Platform is a modern, modular, lightweight and flexible application server that is being used or considered for microservices among Red Hat Middleware customers, who are very aware of its performance and memory optimizations.

If you have a workforce that has vast experience and expertise in Java EE and application servers, you can take advantage of their experience to develop microservices in a modern application server. In a multi-runtime/multi-technology/multi-framework microservices world, Java EE in the form of Red Hat JBoss Enterprise Application Platform, is a runtime in which you can develop microservices. In your selection of a multi-runtime microservices solution, make sure that it supports Java EE, among other runtimes.

VIII. Standards are still important to customers developing microservices

The top three reasons why Red Hat Middleware customers are using or considering to use Java EE for microservices are:

  1. Java EE is a standard
  2. No need to re-train workforce
  3. We trust Java EE to run production because it’s well established and enterprise-grade

This indicates that Red Hat Middleware customers see the value of open source community-driven standards and specifications designed to run enterprise applications and with reliability, availability, scalability and performance (RASP) capabilities. So, if like Red Hat Middleware customers, you are using or considering Java EE as one of your runtimes for microservices, you are in good company.

How can Red Hat help you in your microservices journey?

Red Hat OpenShift Application Runtimes is our modern, cloud-native set of application runtimes and frameworks with a guided developer experience for organizations that are moving beyond 3-tier architectures and embracing cloud-native application development. It consists of a curated set of frameworks and runtimes:

  • Eclipse Vert.x for reactive programming
  • Node.js for JavaScript programming
  • WildFly Swarm / Eclipse MicroProfile – for assembling your project in a runnable jar using open source community-driven enterprise Java libraries for microservices
  • Red Hat JBoss Enterprise Application Platform – for programming using Java EE
  • Apache Tomcat – for web application programming
  • Spring Boot – for assembling your project in a runnable jar using open source enterprise Java libraries

All these frameworks and runtimes are fully integrated into and optimized for Red Hat OpenShift. After a careful and minutious analysis of market and customers needs, Red Hat selected these runtimes for inclusion and integration into Red Hat OpenShift Application Runtimes. Red Hat may update or grow this set of curated runtimes as it continues to monitor market and customers needs. Red Hat OpenShift Application Runtimes also includes the concept of guided missions and boosters to accelerate the development of applications and microservices as well as a cloud-native developer experience through OpenShift.io.

If you need help getting started with your existing applications, Red Hat offers a free Application Modernization and Migration Discovery Workshop. And if you would like to transform your organizational culture, speed up your next application development project, and make DevOps a reality, we have our Open Innovation Labs to help you in this endeavor.

Lastly, our microservices Subject Matter Experts are always available for your consultation and to customers with paid Red Hat subscriptions.

For more information:

Red Hat OpenShift Application Runtimes (on developers.redhat.com)

Red Hat OpenShift Application Runtimes (product landing page)

Eclipse MicroProfile

Red Hat Middleware

Eclipse Vert.x

WildFly Swarm

Red Hat Enterprise Application Platform

Red Hat OpenShift Container Platform

Red Hat Application Modernization

Red Hat Open Innovation Labs

Share

The post The State of Microservices Survey 2017 – Eight trends you need to know appeared first on RHD Blog.

New with JBoss EAP 7.1: Credential Store

$
0
0

In previous versions of JBoss EAP, the primary method of securely storing credentials and other sensitive strings was to use a password vault. A password vault stopped you from having to save passwords and other sensitive strings in plain text within the JBoss EAP configuration files.

However, a password vault has a few drawbacks. For example, each JBoss EAP server can only use one password vault, and all management of the password vault has to be done with an external tool.

New with the elytron subsystem in JBoss EAP 7.1 is the credential store feature.

You can create and manage multiple credential stores from right in the JBoss EAP management CLI, and the JBoss EAP management model now natively supports referring to values in a credential store using the credential-reference attribute. You can also create and use credential stores for Java applications using Elytron Client.

Below is a quick demonstration that shows how to create and use a credential store using the JBoss EAP management CLI.

Create a Credential Store

/subsystem=elytron/credential-store=my_store:add(location="cred_stores/my_store.jceks", relative-to=jboss.server.data.dir,  credential-reference={clear-text=supersecretstorepassword},create=true)

Add a Credential or a Sensitive String to a Credential Store

/subsystem=elytron/credential-store=my_store:add-alias(alias=my_db_password, secret-value="speci@l_db_pa$$_01")

Use a Stored Credential in the JBoss EAP Configuration

The below example uses the previously added credential as the password for a new JBoss EAP data source.

data-source add --name=my_DS --jndi-name=java:/my_DS --driver-name=h2 --connection-url=jdbc:h2:mem:test;DB_CLOSE_DELAY=-1;DB_CLOSE_ON_EXIT=FALSE --user-name=db_user --credential-reference={store=my_store, alias=my_db_password}

Using Credential Stores in EJB Applications

EJBs and other clients can use Elytron Client to create, modify, and access credential stores outside of a JBoss EAP server.

For more information on using credential stores in JBoss EAP 7.1, including how to convert existing password vaults to credential stores, see the JBoss EAP 7.1 How to Configure Server Security guide.

Share

The post New with JBoss EAP 7.1: Credential Store appeared first on RHD Blog.

Develop and Deploy on OpenShift Online Starter using Red Hat JBoss Developer Studio

$
0
0

The OpenShift Online Starter platform is available for free: visit https://manage.openshift.com/. It is based on Red Hat OpenShift Container Platform 3.7. This offering allows you to play with OpenShift Container Platform and deploy artifacts. The purpose of the article is to describe how to use Red Hat JBoss Developer Studio or JBoss Tools together with this online platform.

Install Red Hat JBoss Developer Studio

If you have not already installed Red Hat JBoss Developer Studio or JBoss Tools, go to this webpage: https://developers.redhat.com/products/devstudio/download/ and follow the instructions. If you install JBoss Tools onto an existing Eclipse installation, make sure you select the Jboss Cloud And Container Development Tools‘.

Launch Red Hat JBoss Developer Studio

If you’ve installed Red Hat JBoss Developer Studio, launch the devstudio.sh (on Linux or MacOS) or devstudio.bat (Windows) script.

You should see the following environment:

Define OpenShift Online Starter connection

Select the OpenShift Explorer‘ view (located in the bottom part of the user interface), you should see the following environment:

Click on the New Connection Wizard link inside the OpenShift Explorer ‘view. The following wizard window will be displayed:

In the Server field: enter the following value: https://api.starter-us-east-2.openshift.com. Please note that you may be assign to a different cluster then the host name may be different. If you want to know yours, log in OpenShift Online Starter from a web browser and then select the Command Line Tools menu from the Help menu on the top right. Then click on the retrieve‘ link, a new window will be displayed:

Click on the Log In ‘button, follow the steps and once logged in, you should see a similar window:

Click on the Close ‘button and the token will now be set in the wizard:

Click on the Finish button. The connection will be established and upon success, the OpenShift Explorer ‘view will be updated as below:

If you unfold the connection, you may see the list of OpenShift projects. You should have a single project named after your name. If you can see other projects, then its likely you are also part part of the OpenShift.io offering:

We are now ready to play with the OpenShift Online Starter platform. Let’s see how we can deploy and debug applications.

Deploying and debugging a JBoss Enterprise Application Platform based application

In the following, we will use the OpenShift project that is named after you name to host our deployments.

Deploying the Wildfly based application

Red Hat JBoss Developer Studio provides a wizard for deploying applications onto an OpenShift platform. In the OpenShift Explorer view, right-click the OpenShift project (your_name) and select the ‘New -> Application‘ menu item. The application wizard will then appear:

The list of available applications types is then displayed. In order to reduce the available choices, enter ‘wildfly‘ in the filter text field. The display will be updated as following:

In the list of available application types, select the ‘wildfly:latest‘ item. The details field will be updated accordingly and the Next button is now enabled. Click it. The wizard will now display the following:

As the default application source code (https://github.com/openshift/openshift-jee-sample.git) does not contain Java source code, we will change the following fields in that page:

  • Git Repository URL: https://github.com/wildfly/quickstart.git
  • Git Reference: 10.x
  • Context Directory: kitchensink

The page should now look like:

Click on the Finish button. The application will be created on the OpenShift Online Starter platform and the list of the OpenShift resources is then displayed:

Click the OK button. The deployment will be started and you will see a new wizard for importing the application source files into the local workspace:

Click the Finish button. The source files for the application will be copied from the Github Git repository and a new project will be created in the local workspace:

Once the source files for the application have been successfully imported, you will be asked to create a server adapter. Answer no as we need to check our deployment first.

If you unfold the ‘your_name‘ project in the OpenShift Explorer view, you should see something like:

If you don’t see the ‘wildfly-1 Build Running’ item, then this means that the build has run and this item should have been replaced by the application one. It’s very unlikely as resources are constrained on OpenShift Online Starter and the build took around 1 minute to complete when writing this article.

When the build is finished, the OpenShift Explorer view will be updated and will look like:

The name of the leaf item is dynamically generated but should follow the pattern: wildfly-1-suffix.

Checking the deployment

Let’s access the application now. Right click the ‘wildfly‘ item, and select the ‘Show In -> Web Browser‘ menu item. A new browser window will be opened and you should see the following content:

If you can see this, then the application has been successfully deployed on the OpenShift Online Starter platform. We are now ready to switch to the next phase, debugging.

Debugging the Wildfly based application

Before we go deeper, let’s explain where we are. We’ve deployed an application on the OpenShift Online Starter platform, and we also have downloaded the application source files in our local workspace.

Red Hat JBoss Developer Studio will allow the same user experience for developers when dealing with cloud-oriented applications than for local applications: a local change to an application source file should be available without restarting the application, and debugging the application code should be allowed even if the application is running on the OpenShift Online Starter platform.

Let’s describe how it works:

Red Hat JBoss Developer Studio provides a tool called the OpenShift server adapter that acts as a synchronization tool between a local Eclipse project and an OpenShift deployment (it can be a service, a deployment config or a replication controller).

It can run in two different modes:

  • run: this is the base mode. It offers changes synchronization between the local Eclipse project and the OpenShift deployment. Each time a modified file is detected on the local project, the changes are sent to the OpenShift pods. The file can be a Java file and the .class file will be sent so that the new code can be immediately checked. But this can be also a .jsp file (presentation layer) so that the user interface can also be checked as well.
  • debug mode: this is an advanced case where you have all the synchronization features of the run mode but in addition, the OpenShift deployment will be updated so that the remote JVM is now launched in debug mode and the local Eclipse will also start a remote Java application configuration, which will be connected to the OpenShift pods of the OpenShift deployment. So, if you put breakpoints in files for the local Eclipse project, and if that specific line of code is executed on the remote OpenShift platform, then your local Eclipse will stop execution and display the debugged file!! Isn’t it amazing?

So now that we have an OpenShift deployment available and the corresponding source files in our Eclipse workspace, let’s play!!!

Creating the OpenShift server adapter

In order to create the OpenShift server adapter, you need a running deployment and a local Eclipse workspace. As we have one and we downloaded the application source files, this will be easy for us.

In the OpenShift Explorer view, select the ‘wildfly’ node, right-click and select the ‘Server Adapter…‘ menu item. A new wizard will be displayed:

You should select the local Eclipse project that will be synchronized with the OpenShift deployment and the OpenShift deployment. As we have a single Eclipse project in our workspace and a single OpenShift deployment, they will be automatically selected and you can use the defaults so click the ‘Finish‘ button.

First, the Servers view will be automatically displayed and the newly created server will be added to the view. Then the Console view will be displayed and you’re going to see messages displayed there: this is the synchronization process that has been initiated to make sure the local Eclipse project is up to date with the OpenShift deployment:

Update the application files and see the changes propagated live

In this scenario, we will modify the welcome page of the application and check that change has been propagated to the OpenShift deployment.

In the Project Explorer view, unfold the ‘wildfly-kitchsink‘ project, under that project, unfold the Deployed Resources node, you should see a ‘webapp‘ node, unfold it and double click the index.xhtml file:

If you scrolled down a few lines, you should see the following line:

<h1>Welcome to Wildfly!</h1>

Replace it with the following content:

<h1>Welcome to Wildfly! from Red Hat JBoss Developer Studio</h1>

save and close the editor (Ctrl + W).

You should see some messages in the ‘Console’ view: changes are propagated to the OpenShift deployment.

Let’s check that this is real !!!!

In the OpenShift explorer view, select the ‘jboss-eap70-openshift‘ item, right click and select the ‘Show In -> Browser‘ menu item. A new browser window will be displayed with the following content:

As you can see, the title of the page has been updated !!!!

Now let’s go a little more complex and debug our application.

Debugging the application

The first step to follow is to have our deployment switch to debug mode. This is simply done by restarting the server adapter we’ve just created in debug mode (it should be called wildfly (Service) at OpenShift 3 (api.starter-us-east-2.openshift.com)). Select the Servers view, and then select the OpenShift server adapter we’ve just created, right-click and select the ‘Restart in Debug‘ menu item. You will see some synchronization messages again in the Console view, but if you switch back to the Servers view, the status of the OpenShift server adapter should be updated to [Debugging, Synchronized]. Please note that due to OpenShift Online Starter constraints, this can be a long-standing operation so be patient:

Next, we need to set a breakpoint in the application code. As the application allows to register new members, we will set a breakpoint where the registration is done. As the application is designed following the MVC pattern, we will put the breakpoint into the controller.

In the Project Explorer view, unfold the ‘wildfly-kitchsink‘ project, under that project, unfold the Java Resources node, you should see a ‘src/main/java‘ node, unfold it, unfold the ‘org.jboss.as.quickstarts.kitchensink.controller‘ package and double click the MemberController.java file:

If you scrolled down a little, you can see the whole content of the register method:

Let’s put a breakpoint on the first line of code of this method: this should be line 54, the code should be:

memberRegistration.register(newMember);

Double click on the left ruler, next to the 54 line number, the breakpoint will be set and a little blue balloon will appear:

We’re now all set. We have our deployment running in debug mode thanks to the OpenShift server adapter restarted in debug mode and we set a breakpoint in the application code. We need now to reach that line of code so we need to launch the application user interface for that.

So, as we did previously, go back to the OpenShift Explorer view, select the ‘wildfly‘ node, right click it and select the ‘Show In -> Web Browser‘ menu item and the application user interface will be displayed in a new browser window:

In the displayed form, enter any name (demo), an email address and a telephone number (must be between 10 and 12 digits) and click the Register button.

If this is the first time you debug an application or if your workspace is new, you will see a dialog box asking you to switch to the Debug perspective. Click the Yes button. Otherwise, you will be driven automatically to the Debug perspective:

We did it. We reached the breakpoint and if you unfold the ‘this’ variable in the Variables view, you should see the values that you submitted:

Then you can step (in or out) in the code just like with a local Java application.

So, you’ve just discovered how trivial it was to debug a remotely deployed Java application. And we have even more. Red Hat JBoss Developer Studio also allows the same user experience for NodeJS based applications!! We will cover this in the second part of this article.


Red Hat JBoss Developer Studio is available for download, install it today. 


Join the Red Hat Developer Program (it’s free) and get access to related cheat sheets, books, and product downloads.


For more information about Red Hat OpenShift and other related topics, visit: OpenShift, OpenShift Online.

Share

The post Develop and Deploy on OpenShift Online Starter using Red Hat JBoss Developer Studio appeared first on RHD Blog.

Enabling SAML-based SSO with Remote EJB through Picketlink

$
0
0

Lets suppose that you have a remote Enterprise JavaBeans (EJB) application where the EJB client is a service pack (SP) application in a Security Assertion Markup Language (SAML) architecture. You would like your remote EJB to be authenticated using same assertion which was used for SP.

Before proceeding with this tutorial, you should have a basic understanding of EJB and Picketlink.

I have developed a POC based on Picketlink. Below are the things I have done to achieve it.
  •  Set Picketlink to sign response and assertion in identity provider (IDP) application.
    Configure:
    `SAML2SignatureGenerationHandler` like the following in picketlink.xml of IDP application.
    <Handler class="org.picketlink.identity.federation.web.handlers.saml2.SAML2SignatureGenerationHandler">
         <Option Key="SIGN_RESPONSE_AND_ASSERTION" Value="true"/>
     </Handler>
  • Set picketlink to store SAML assertion in http-session in SP application.
    Configure:
    `SAML2AuthenticationHandler`  like the following in picketlink.xml of SP application.
    <Handler class="org.picketlink.identity.federation.web.handlers.saml2.SAML2AuthenticationHandler">
         <Option Key="ASSERTION_SESSION_ATTRIBUTE_NAME" Value="org.picketlink.sp.assertion"/>
     </Handler>
  •  Configure the sp security-domain something like below setting flag “sufficient” for both the login module and for the IDP application. You can configure your customized login module or you can use any login module available in picketbox.
      <security-domain name="sp" cache-type="default">
         <authentication>
            <login-module code="org.picketlink.identity.federation.bindings.jboss.auth.SAML2LoginModule" flag="sufficient" />
            <login-module code="org.picketlink.identity.federation.bindings.jboss.auth.SAML2STSLoginModule" flag="sufficient">
                 <module-option name="roleKey" value="Role"/>
                 <module-option name="localValidation" value="true"/>
                 <module-option name="localValidationSecurityDomain" value="sp"/>
            </login-module>
          </authentication>
       </security-domain>
  •  In your servlet (EJB client/SP application) you need to get the signed assertion and send it along with the EJB invocation for verification like below. Here, I have used ejb-remote application which is available in quickstart [1].
//Getting Signed SAML Assertion
public String getSignedAssertion(HttpServletRequest httpRequest) throws Exception {
         HttpSession session = httpRequest.getSession();
         String cachedSignedAssertion = (String) session.getAttribute("org.picketlink.sp.assertion.signed");
         if (cachedSignedAssertion == null) {
             Document assertion = (Document) session.getAttribute("org.picketlink.sp.assertion");
             String stringSignedAssertion = DocumentUtil.asString(assertion);
             System.out.println(stringSignedAssertion);
             return stringSignedAssertion;
         } else {
             System.out.println("...cached assertion...");
             return cachedSignedAssertion;
         }
     }

//EJB invocation
public void getInitialContext(String assertion, String username) throws Exception, NamingException {

         Properties props = new Properties();
         props.put("remote.connectionprovider.create.options.org.xnio.Options.SSL_ENABLED", "false");
         props.put(Context.URL_PKG_PREFIXES, "org.jboss.ejb.client.naming");
         props.put("remote.connections", "default");
         props.put("remote.connection.default.port", "4447");
         props.put("remote.connection.default.host", "10.10.10.10");
         System.out.println("Connecting...");
         props.put("remote.connection.default.username", username);
         props.put("remote.connection.default.password", assertion);
         props.put("remote.connection.default.connect.options.org.xnio.Options.SASL_POLICY_NOPLAINTEXT","false");
         props.put("remote.connection.default.connect.options.org.xnio.Options.SASL_POLICY_NOANONYMOUS","false");
         Context context = new InitialContext(props);
         RemoteCounter aa = (RemoteCounter) context.lookup("ejb:/jboss-ejb-remote-server-side//CounterBean!org.jboss.as.quickstarts.ejb.remote.stateful.RemoteCounter?stateful");
         System.out.println(aa.getCount());
         aa.increment();
         System.out.println(aa.getCount());
         System.out.println("EJB Executed... using SAML assertion");
     }
You can get the IDP and SP sample of Picketlink at [2] below:
  1.  https://github.com/jboss-developer/jboss-eap-quickstarts/tree/6.4.x/ejb-remote
  2.  https://github.com/jboss-developer/jboss-picketlink-quickstarts

That’s it for today!


Take advantage of your Red Hat Developers membership and download RHEL today at no cost.


Join the Red Hat Developer Program (it’s free) and get access to related cheat sheets, books, and product downloads.

Share

The post Enabling SAML-based SSO with Remote EJB through Picketlink appeared first on RHD Blog.

It’s Time To Accelerate Your Application Development With Red Hat JBoss Middleware And Microsoft Azure

$
0
0

The role of applications has changed dramatically. In the past, applications were running businesses, but primarily relegated to the background. They were critical, but more operational in the sense that they kept businesses running, more or less. Today, organizations can use applications as a competitive advantage. In fact, a well-developed, well-timed application can disrupt an entire industry. Just take a look at the hotel, taxi, and movie rental industries respectively.

Read Derek Mitchell’s post: It’s Time To Accelerate Your Application Development With Red Hat JBoss Middleware And Microsoft Azure on the Red Hat JBoss Middleware blog.

Share

The post It’s Time To Accelerate Your Application Development With Red Hat JBoss Middleware And Microsoft Azure appeared first on RHD Blog.


Announcing Developer Studio 11.2.0.GA and JBoss Tools 4.5.2.Final for Eclipse Oxygen.2

$
0
0

The community editions of JBoss Tools 4.5.2 and JBoss Developer Studio 11.2 for Eclipse Oxygen.2 are here waiting for you. Check it out!

Installation

JBoss Developer Studio comes with everything pre-bundled in its installer. Simply download it from our JBoss Products page and run it like this:

java -jar jboss-devstudio-<installername>.jar

JBoss Tools or Bring-Your-Own-Eclipse (BYOE) JBoss Developer Studio require a bit more:

This release requires at least Eclipse 4.7 (Oxygen) but we recommend using the latest Eclipse 4.7.2 Oxygen JEE Bundle since then you get most of the dependencies preinstalled.

Once you have installed Eclipse, you can either find us on the Eclipse Marketplace under “JBoss Tools” or “Red Hat JBoss Developer Studio”.

For JBoss Tools, you can also use our update site directly.

http://download.jboss.org/jbosstools/oxygen/stable/updates/


What is new?

Our main focus for this release was on adoption of Java9, improvements for container based development and bug fixing. Eclipse Oxygen itself has a lot of new cool stuff but let me highlight just a few updates in both Eclipse Oxygen and JBoss Tools plugins that I think are worth mentioning.

OpenShift 3

Spring Boot applications support in OpenShift server adapter

The OpenShift server adapter allowed hotdeploy and debugging for JEE and NodeJS based applications. It now supports Spring Boot applications with some limitations: the Spring Boot devtools module must be added to your application as it monitors code changes and as the application must be launched in exploded mode, you must use the upstream image (docker.io/fabric8/s2i-java) rather than the downstream image builder fis-java-openshift.

As an example, we’ve provided an OpenShift template that will create an OpenShift application based on the upstream application and a Git repository that added the Spring Boot devtools to the Fabric8 Spring Boot quickstart.

You can see a demo of the OpenShift server adapter for Spring Boot application here:

Support for route timeouts and liveness probe for OpenShift Server Adapter debugging configurations

While debugging your OpenShift deployment, you may face two different issues:

  • if you launch your test through a Web browser, then it’s likely that you will access your OpenShift deployment through an OpenShift route. The problem is that, by default, OpenShift routes have a 30 seconds timeout for each request. So if you’re stepping through one of your breakpoints, you will get a timeout error message in the browser window even if you can still debug your OpenShift deployment. And you’re now stuck will the navigation of your OpenShift application.
  • if your OpenShift deployment has a liveness probe configured, depending on your virtual machine capabilities or how your debugger is configured, if your stepping into one of your breakpoints, the liveness probe may fail thus OpenShift so OpenShift will restart your container and your debugging session will be destroyed.
 So, from now, when the OpenShift server adapter is started in debug mode, the following action are being performed:
  • if an OpenShift route is found that is linked to the OpenShift deployment you want to debug, the route timeout will be set or increased to 1 hour. The original or default value will be restored when the OpenShift server adapter will be restarted in runmode.
  • if your OpenShift deployment has a liveness probe configured, the initialDelay field will be increased to 1 hour if the defined value for this field is lower than 1 hour. If the value of this field is defined to a value greater than 1 hour, it is left intact. The original value will be restored when the OpenShift server adapter will be restarted in run mode

Enhanced command to delete resource(s)

When it comes to delete OpenShift resources, you had two different choices:

  • individually delete each resource but as some resources are hidden by the OpenShift explorer, it may become troublesome
  • delete the containing OpenShift project but you are then deleting more resources than required

There is now a new enhanced command to delete resources. It is available at the OpenShift project level and it will first list all the available OpenShift resources for the selected OpenShift project. You can now select the ones you want to delete and you can also filter the list using a filter that will be applied to the labels for each retrieved OpenShift resource.

So if you have two different deployments in a single OpenShift project (if you using OpenShift Online Starter for example) or if you have different kind of resources in a single deployment, you can now distinct them.

Let’s see this in action:

In this example, I have deployed an EAP6.4 based application and an EAP7.0 based one. Here is what you can see from the OpenShift explorer:

Now, let’s invoke the new delete command on the eap OpenShift project: right click the OpenShift project and select Delete Resources…​:

Let suppose that we want to delete the EAP6.4 deployment. Enter eap=6.4 in the filter field:

Push the Select All button:

Close this dialog by pushing the OK button. The resources will be deleted and the OpenShift explorer will be updated accordingly:


Server tools

EAP 7.1 Server Adapter

A server adapter has been added to work with EAP 7.1 and Wildfly 11. It’s based on WildFly 11. This new server adapter includes support for incremental management deployment like it’s upstream WildFly 11 counterpart.

Fuse Tooling

Fuse 7 Karaf-based runtime Server adapter

Fuse 7 is cooking and preliminary versions are already available on early-access repository. Fuse Tooling is ready to leverage them so that you can try the upcoming major Fuse version.

Fuse 7 Server Adapter

Classical functionalities with server adapters are available: automatic redeploy, Java debug, Graphical Camel debug through created JMX connection. Please note: – you can’t retrieve the Fuse 7 Runtime yet directly from Fuse tooling, it is required to download it on your machine and point to it when creating the Server adapter. – the provided templates requires some modifications to have them working with Fuse 7, mainly adapting the bom. Please see work related to it in this JIRA task and its children.

Display routes defined inside “routeContext” in Camel Graphical Editor (Design tab)

“routeContext” tag is a special tag used in Camel to provide the ability to reuse routes and to split them across different files. This is very useful on large projects. See Camel documentation for more information. Since this version, the Design of the routes defined in “routeContext” tags are now displayed.

Usability improvement: Progress bar when “Changing the Camel version”

Since Fuse Tooling 10.1.0, it is possible to change the Camel version. In case the Camel version was not cached locally yet and for slow internet connections, this operation can take a while. There is now a progress bar to see the progress.

Switch Camel Version with Progress Bar

Support for creating Fuse Ignite Technical Extensions

We are happy to announce the addition of support for creating Technical Extension projects for Fuse Ignite*. That includes the creation of the project using the “New Fuse Ignite Extension Project” wizard as well as support for building the deployable artifact directly from inside the Eclipse environment.

Fuse Ignite is a JBoss Fuse feature that provides a web interface for integrating applications. Without writing code, a business expert can use Ignite to connect to applications and optionally operate on data between connections to different applications. In Ignite, a data operation is referred to as a step in an integration. Ignite provides steps for operations such as filtering and mapping data. To operate on data in ways that are not provided by Ignite built-in steps, you can develop an Ignite extension to define one or more custom steps. Fuse Ignite comes as part of Fuse and Fuse Online. Please refer to the online documentation for more information on how to create and configure technical extensions for Fuse Ignite.

Fuse Ignite Technical Extension Wizard

The provided project template allows you to define an Apache Camel route as the base flow of your new technical extension.

Fuse Ignite Technical Extension Route

To configure your new technical extension you can use the JSON file created with the new project.

Fuse Ignite Technical Extension Configuration

Forge Tools

Forge Runtime updated to 3.8.1.Final

The included Forge runtime is now 3.8.1.Final. Read the official announcement here.

And more…​

You can find more noteworthy updates in on this page.

What is next?

Having JBoss Tools 4.5.2 and Developer Studio 11.2 out we are already working on the next maintenance release for Eclipse Oxygen.

Share

The post Announcing Developer Studio 11.2.0.GA and JBoss Tools 4.5.2.Final for Eclipse Oxygen.2 appeared first on RHD Blog.

Elytron: A New Security Framework in WildFly/JBoss EAP

$
0
0

Elytron is a new security framework that ships with WildFly version 10 and Red Hat JBoss Enterprise Application Platform (EAP) 7.1. This project is a complete replacement of PicketBox and JAAS. Elytron is a single security framework that will be usable for securing management access to the server and for securing applications deployed in WildFly. You can still use the legacy security framework, which is PicketBox, but it is a deprecated module; hence, there is no guarantee that PicketBox will be included in future releases of WildFly. In this article, we will explore the components of Elytron and how to configure them in Wildfly.

The Elytron project covers the following: 

  • SSL/TLS
  • Secure credential storage
  • Authentication
  • Authorization

In this article, we are going to explore using SSL/TLS in WildFly with Elytron.

This is the basic architecture of SSL/TLS in Elytron:

The key attribute here is SSLContext, which also has the reference the following component:

  • Key-Manager:  key-manager keeps the reference of key-store to be used and load the keys.
  • Trust-Manager: This also keeps the reference of key-store, basically used for trustCertificates. If all the certificates are present in the keystore referenced by key-manager, configuring trust-manager is not required. However, for outbound connections, a trust-manager can be used.
  • Security-Domain: This is an optional parameter,  However, if SSLContext is configured with a reference to a security-domain, then the verification of a client’s certificate can be performed as an authentication, thus ensuring the appropriate permissions for a login are assigned before even allowing the connection to be fully opened.

SSLContext also defines the type of SSL communication (one-way/two-way) along with allowed protocol and cipher-suite details.

Configure the SSLContext to Be Used by the Management Interface and the Undertow Subsytem 

Before, we start configuring SSL/TLS in Elytron, we should have a certificate. In this tutorial, we will create a self-signed certificate to understand how SSL/TLS works in Elytron.

To manage the certificate/keystore, I have used here keytool CLI-based utility that ships with Java. However, one can manage the certificate/keystore using another utility, such as  Portecle, which allows to manage the keystore/certificate graphically and does not require to remember long command lines.

First, use keytool to generate the keystore and a self-signed certificate, executing a command similar to the following in the OS terminal command line:

keytool -genkeypair -alias wildfly -keyalg RSA -sigalg SHA256withRSA -validity 365 -keysize 2048 -keypass jboss@123 -storepass jboss@123 -dname "CN=developer.jboss.org, C=IN" -ext san=dns:developers.redhat.org,dns:developers.wildfly.org -keystore wildfly.jks

Note: This is just an example, you need to change the common name (CN) and other attribute as per your organization requirement and set the password accordingly.

Once we are ready with the certificate/keystore, need to perform the following steps to configure the Elytron subsystem for enabling SSL/TLS. Here, I am demonstrating the configuration using the JBoss CLI.

  • First, we need to connect to the JBoss CLI by executing the jboss-cli command available in the directory $WildFly_Home/bin.
  • Next, configure a key-store component in the Elytron subsystem with the newly created keystore (here wildfly.jks is placed at $WildFly_Home/ssl).
/subsystem=elytron/key-store=wildflyKS:add(type=JKS,path="${jboss.home.dir}/ssl/wildfly.jks",credential-reference={clear-text=jboss@123})
  • Then, create a new key-manager component in the Elytron subsystem referencing the key-store component created above. To do this, need to execute the command like below:

/subsystem=elytron/key-manager=wildflyKM:add(algorithm=SunX509,key-store=wildflyKS,credential-reference={clear-text=jboss@123})

Note: We are required to give the password (e.g. jboss@123) of keystore here while creating key-manager.

  • Finally, configure a new server-ssl-context referencing the key-manager component created in the previous step:
/subsystem=elytron/server-ssl-context=wildlfySSC:add(key-manager=wildflyKM,protocols=[TLSv1.2])

To enable SSL/TLS through Elytron, we are required to execute the following two commands to configure the Undertow https-listener and map the ssl-context with Elytron. By default, the https-listener is configured with the ApplicationRealm security realm, and by default, ApplicationRealm generates a self-signed certificate during the first startup of WildFly. You need to do batch execution, because both of the commands have to execute simultaneously, else you can remove the https-listener and add the https-listener again with ssl-context .

batch
/subsystem=undertow/server=default-server/https-listener=https:undefine-attribute(name=security-realm)
/subsystem=undertow/server=default-server/https-listener=https:write-attribute(name=ssl-context,value=wildlfySSC)
run-batch

Now for the management interface to use the same ssl-context, we need to execute the following commands in the JBoss CLI, which will also enable SSL for the management interface:

  • Before, configuring ssl-context for the management-interface, we need to configure secure-port for the management-http interface for communicating over SSL/TLS
/core-service=management/management-interface=http-interface:write-attribute(name=secure-socket-binding,value=management-https)
  • Map the same ssl-context with management-http interface for enabling SSL/TLS
/core-service=management/management-interface=http-interface:write-attribute(name=ssl-context,value=wildflySSC)

Now, to test your configuration and the SSL/TLS handshake, make a request over the HTTPS protocol using your browser. To do this, you can also use the openssl command-line utility, for example:

openssl s_client -connect developers.redhat.com:8443

You can also use the  SSL testing tool to check the certificate and the allowed protocol and ciphers. Once you have completed the setup, you can make your system live for the production usage.

There are couple of features in Elytron that were not there in earlier JBoss versions:

  • Elytron prints a warning message in the log upon expiration of the certificate used in the Elytron subsystem.
  • It is possible to load the certificate keystore without restarting/reloading the instance, although there are still some challenges.
  • Elytron also provides the facility to check the certificate details.

Share

The post Elytron: A New Security Framework in WildFly/JBoss EAP appeared first on RHD Blog.

What Does the New JBoss EAP CD Release Stream Mean for Developers?

$
0
0

A new release stream of Red Hat JBoss Enterprise Application Platform is now available: JBoss EAP continuous delivery (JBoss EAP CD).

JBoss EAP CD provides rapid incremental releases of new JBoss EAP capabilities approximately every quarter and is delivered only in Red Hat OpenShift image format.

What does this new JBoss EAP CD release stream mean for developers?

  • Faster access to new JBoss EAP features
    JBoss EAP CD is closely aligned with upstream WildFly development. New JBoss EAP features are introduced in JBoss EAP CD before they make it into the traditional JBoss EAP release stream.
  • Cloud-first JBoss EAP development
    JBoss EAP CD has a cloud-first focus. Because JBoss EAP CD is released only as OpenShift images, new JBoss EAP features are built for cloud environments from the start.
  • An enterprise Java application platform that is built for container-based workflows
    JBoss EAP CD enables you to develop your enterprise applications to use powerful OpenShift container workflows and features before they arrive in the traditional JBoss EAP release stream.
  • Free access to JBoss EAP CD images for development purposes
    Like traditional JBoss EAP releases, JBoss EAP CD is available in the Red Hat Developer Program. This means you can get free access to JBoss EAP CD images for development purposes.

JBoss EAP CD 12 is the first release in the new delivery stream. The JBoss EAP CD images are available in the Red Hat Container Catalog, and you can find the documentation for JBoss EAP CD on the Red Hat Customer Portal.

Share

The post What Does the New JBoss EAP CD Release Stream Mean for Developers? appeared first on RHD Blog.

How to integrate A-MQ 6.3 on Red Hat JBoss EAP 7

$
0
0

This article describes in detail how to integrate Red Hat A-MQ 6.3 on Red Hat JBoss Enterprise Application Platform (EAP) 7 and covers in detail the admin-object configuration, especially the pool-name configuration. The attribute pool-name for the admin-object explanation can lead to confusion. In this post, I will try to clarify many of the steps, give an overview of the components, and how they fit together.

The JBoss EAP requires the configuration of a resource adapter as a central component for integration with the A-MQ 6.3. In addition, the MDBs configuration on the EAP is required to enable the JMS consumers. On the A-MQ 6.3, the configuration of the Transport Connectors is required to open the communication channel with the EAP.

All the steps required to configure EAP 7 to use A-MQ 6.3 as an external JMS broker are described here:

Overview of JBoss EAP and A-MQ components

First, is important to understand the components involved in the configuration and the relationship between them.

Resource Adapter

The resource adapter is the central component for the JBoss EAP configuration. It provides the link from the EAP to the A-MQ broker.

In a nutshell, a resource adapter is a deployable Java EE component (usually a .rar file). The resource adapter provides communication between a Java EE application (usually deployed on the JBoss EAP instance) and an Enterprise Information System (EIS) using the Java Connector Architecture (JCA) specification.

A resource adapter is often provided by EIS vendors to allow easy integration of their products with Java EE applications.

On JBoss EAP 7, the resource adapters are defined in the resource-adapter subsystem.

MDB

The MDB configuration in JBoss EAP provides the capability to the Java applications to create a consumer of the A-MQ linked to JBoss EAP. In addition, the MDB pool provides a constraint on the number of instances and sessions available.

Transport Connectors

The Transport Connectors are endpoints defined on the A-MQ broker that allows client-broker communication. The Transport Connectors can be configured using different Transport Protocols (TCP, SSL, HTTP, HTTPS, etc.) and can support different Wire Protocols (Openwire, STOMP, AMQP, etc.)

Components integration overview

The image below depicts in a simple way how the components described above are related.

Generic Resource Adapter configuration on EAP 7

In JBoss EAP 7.1, the recommended messaging broker is AMQ 7, which has an integrated resource adapter in the messaging subsystem. However, is possible to use a different messaging broker or a legacy A-MQ messaging broker.

Extract the resource adapter from the A-MQ 6.3 distribution.

The initial step is to extract the .rar file from the A-MQ 6.3 distribution to a more accessible location. The resource adapter zip container is located in $AMQ_HOME/extras/apache-activemq-5.11.0.redhat-[LATEST_VERSION]-bin.zip.

unzip $AMQ_HOME/extras/apache-activemq-5.11.0.redhat-[LATEST_VERSION]-bin.zip \
-d /tmp

Extract the file to a known location: [AMQ_RAR_DIRECTORY].

Deploy the resource adapter in a standalone/domain JBoss server using the CLI.

Server$ jboss-cli.sh

In a standalone server:

Server$ deploy /tmp/apache-activemq-5.11.0.redhat-[LATEST_VERSION]/lib/optional\
/activemq-rar-5.11.0.redhat-[LATEST_VERSION].rar

In a domain managed server:

Server$ deploy /tmp/apache-activemq-5.11.0.redhat-[LATEST_VERSION]/lib/optional\
/activemq-rar-5.11.0.redhat-[LATEST_VERSION].rar \
–server-groups=[SERVER_GROUP_1],[SERVER_GROUP_2],...

Deploy the resource adapter using the management console.

Is also possible to deploy the resource adapter using the management console

Manual resource adapter deployment in a standalone server using the deployment scanner:

In order to deploy a resource adapter manually to a standalone server, copy the resource adapter archive to the server deployments directory $EAP_HOME/standalone/deployments/. As a result, the scanner will inspect the deployments directory and deploy the resource adapter.

New profiles for domain managed server:
Probably, it is a requirement to have different server groups working with different broker technology or configuration. In order to achieve a better separation of concerns regarding access to JMS services, a new profile that contains the broker configuration can be created.

Resource adapter manual configuration

Add a resource adapter element to the resource-adapters subsystem:

<subsystem xmlns="urn:jboss:domain:resource-adapters:4.0">
  <resource-adapters>
    <resource-adapter id="activemq-rar.rar" statistics-enabled="true">
    </resource-adapter>
  </resource-adapters>
</subsystem>

Definition of the archive of the resource adapter:

<subsystem xmlns="urn:jboss:domain:resource-adapters:4.0">
  <resource-adapters>
    <resource-adapter id="activemq-rar.rar" statistics-enabled="true">
      <archive>
        activemq-rar.rar
      </archive>
    </resource-adapter>
  </resource-adapters>
</subsystem>

Set up different configuration properties:
First, set up the server URL, the access credentials, and the type of transaction support.

<subsystem xmlns="urn:jboss:domain:resource-adapters:4.0">
  <resource-adapters>
    <resource-adapter id="activemq-rar.rar" statistics-enabled="true">
      <archive>
        activemq-rar.rar
      </archive>
      <transaction-support>XATransaction</transaction-support>
      <config-property name="ServerUrl">
        tcp://[BROKER_HOST]:[BROKER_PORT]
      </config-property>
      <config-property name="UserName">
        myusername
      </config-property>
      <config-property name="Password">
        mypassword
      </config-property>
    </resource-adapter>
  </resource-adapters>
</subsystem>

Establish connection definitions:
A possible connection-definition class-name can be: org.apache.activemq.ra.ActiveMQManagedConnectionFactory. The election depends on the type of factory you have to use.

<subsystem xmlns="urn:jboss:domain:resource-adapters:4.0">
  <resource-adapters>
    <resource-adapter id="activemq-rar.rar" statistics-enabled="true">
      <archive>
        activemq-rar.rar
      </archive>
      <transaction-support>XATransaction</transaction-support>
      <config-property name="ServerUrl">
        tcp://[BROKER_HOST]:[BROKER_PORT]
      </config-property>
      <config-property name="UserName">
        myusername
      </config-property>
      <config-property name="Password">
        mypassword
      </config-property>
      <connection-definitions>
        <connection-definition class-name="com.ra.EISManagedConnectionFactory" 
             jndi-name="java:/jms/connection/amq/ManagedConnectionFactory" 
             enabled="true" 
             pool-name="A-MQ">
          <xa-pool>
            <min-pool-size>1</min-pool-size>
            <max-pool-size>50</max-pool-size>
            <prefill>false</prefill>
            <is-same-rm-override>false</is-same-rm-override>
          </xa-pool>
          <validation>
            <use-fast-fail>false</use-fast-fail>
          </validation>
        </connection-definition>
      </connection-definitions>      
    </resource-adapter>
  </resource-adapters>
</subsystem>

Configure XA Recovery plugin:
The “XA recovery” is the process that updates or rollback a transaction if one of the participant crash or is unavailable. XA recovery happens without user intervention.

Each XA resource needs to have a recovery module associated with its configuration.

<subsystem xmlns="urn:jboss:domain:resource-adapters:4.0">
  <resource-adapters>
    <resource-adapter id="activemq-rar.rar" statistics-enabled="true">
      <archive>
        activemq-rar.rar
      </archive>
      <transaction-support>XATransaction</transaction-support>
      <config-property name="ServerUrl">
        tcp://[BROKER_HOST]:[BROKER_PORT]
      </config-property>
      <config-property name="UserName">
        myusername
      </config-property>
      <config-property name="Password">
        mypassword
      </config-property>
      <connection-definitions>
        <connection-definition class-name="com.ra.EISManagedConnectionFactory" 
             jndi-name="java:/jms/connection/amq/ManagedConnectionFactory" 
             enabled="true" 
             pool-name="A-MQ">
          <xa-pool>
            <min-pool-size>1</min-pool-size>
            <max-pool-size>50</max-pool-size>
            <prefill>false</prefill>
            <is-same-rm-override>false</is-same-rm-override>
          </xa-pool>
          <validation>
            <use-fast-fail>false</use-fast-fail>
          </validation>
          <recovery>
            <recover-credential>
              <user-name>recoveryuser</user-name>
              <password>recoverypassword</password>
            </recover-credential>
            <recover-plugin 
               class-name="org.jboss.jca.core.recovery.ConfigurableRecoveryPlugin">
              <config-property name="enableIsValid">
                false
              </config-property>
              <config-property name="isValidOverride">
                true
              </config-property>
            </recover-plugin>
          </recovery>
        </connection-definition>
      </connection-definitions>      
    </resource-adapter>
  </resource-adapters>
</subsystem>

Admin objects setup and configuration:

The admin objects are created in order to provide JNDI lookup of JMS queues for JBoss EAP applications.

The attribute that often causes problems to define an unanswered question is the pool-name attribute of the admin-object. The attribute “pool-name is not implemented in JBoss EAP, that means, this attribute should not be used.

<subsystem xmlns="urn:jboss:domain:resource-adapters:4.0">
  <resource-adapters>
    <resource-adapter id="activemq-rar.rar" statistics-enabled="true">
      <archive>
        activemq-rar.rar
      </archive>
      <transaction-support>XATransaction</transaction-support>
      <config-property name="ServerUrl">
        tcp://[BROKER_HOST]:[BROKER_PORT]
      </config-property>
      <config-property name="UserName">
        myusername
      </config-property>
      <config-property name="Password">
        mypassword
      </config-property>
      <connection-definitions>
        <connection-definition class-name="com.ra.EISManagedConnectionFactory" 
             jndi-name="java:/jms/connection/amq/ManagedConnectionFactory" 
             enabled="true" 
             pool-name="A-MQ">
          <xa-pool>
            <min-pool-size>1</min-pool-size>
            <max-pool-size>50</max-pool-size>
            <prefill>false</prefill>
            <is-same-rm-override>false</is-same-rm-override>
          </xa-pool>
          <validation>
            <use-fast-fail>false</use-fast-fail>
          </validation>
          <recovery>
            <recover-credential>
              <user-name>recoveryuser</user-name>
              <password>recoverypassword</password>
            </recover-credential>
            <recover-plugin 
              class-name="org.jboss.jca.core.recovery.ConfigurableRecoveryPlugin">
              <config-property name="enableIsValid">
                false
              </config-property>
              <config-property name="isValidOverride">
                true
              </config-property>
            </recover-plugin>
          </recovery>
        </connection-definition>
      </connection-definitions>      
      <admin-objects>
        <admin-object class-name="org.apache.activemq.command.ActiveMQQueue" 
             jndi-name="java:/jms/myapp/myqueuename" 
             pool-name="MY_POOL_NAME">
          <config-property name="PhysicalName">
            myapp_mycontext_myqueuename
          </config-property>
        </admin-object>
      </admin-objects>      
    </resource-adapter>
  </resource-adapters>
</subsystem>

Resource adapter CLI configuration

You can configure resource adapters using the management interfaces. I show below how to configure a resource adapter using the management CLI. If you are using this document as a reference for other resource adapters, it is important to check the vendor’s documentation for supported properties and other important information.

Add a resource adapter element to the resource-adapters subsystem and define the archive of the resource adapter:

/subsystem=resource-adapters/resource-adapter=eis.rar:add(archive=eis.rar, \
transaction-support=XATransaction)

Define different configuration properties:

Add the server configuration property.

/subsystem=resource-adapters/resource-adapter=activemq-rar.rar/\
config-properties=server:add(value=[$AMQ_BROKER_URL])

Add the port configuration property.

/subsystem=resource-adapters/resource-adapter=activemq-rar.rar/\
config-properties=port:add(value=[$AMQ_BROKER_PORT])

Define connection definitions:

Add a connection definition for a managed connection factory.

/subsystem=resource-adapters/resource-adapter=eis.rar/\
connection-definitions=cfName:add(class-name=com.ra.EISManagedConnectionFactory, \
jndi-name=java:/jms/connection/amq/ManagedConnectionFactory)

Configure a managed connection factory configuration property.

/subsystem=resource-adapters/resource-adapter=eis.rar/connection-definitions=cfName/\
config-properties=name:add(value=Acme Inc)

Configure XA Recovery plugin:

In order to correctly define the “recovery-plugin-properties” using the CLI commands, first, add “recovery-plugin-class-name”.

/subsystem=datasources/xa-data-source=test-xa-datasource/\
:write-attribute(name=recovery-plugin-class-name,\
value=org.jboss.jca.core.recovery.ConfigurableRecoveryPlugin)

Then add the “recovery-plugin-properties”.

/subsystem=datasources/xa-data-source=test-xa-datasource/\
:write-attribute(name=recovery-plugin-properties,\
value={"EnableIsValid" => "false",\
"IsValidOverride" => "true",\
"EnableClose" => "false"})

Admin objects setup and configuration:

Add an admin object.

/subsystem=resource-adapters/resource-adapter=activemq-rar.rar/\
admin-objects=aoName:add(\
class-name=org.apache.activemq.command.ActiveMQQueue, \
jndi-name=java:/jms/myapp/myqueuename)

Configure an admin object configuration property.

/subsystem=resource-adapters/resource-adapter=activemq-rar.rar/\
admin-objects=aoName/config-properties=threshold:add(value=10)

Activate the Resource Adapter:

Activate the resource adapter.

/subsystem=resource-adapters/resource-adapter=activemq-rar.rar:activate	

MDB configuration for EJB subsystem

First is important to understand what an MDB is. MDBs are a special kind of stateless session beans and they are the JMS consumer of a specific queue.

They implement a method called onMessage(Message message) executed when a JMS destination on which the MDB is listening receives a message.

The JMS consumer is responsible to trigger a MDBs asynchronously.

By default, the MDBs have 16 sessions to process messages concurrently.

Add the requisite message-driven bean configuration to the urn:jboss:domain:ejb3 subsystem in the JBoss EAP configuration.

<mdb>
  <resource-adapter-ref resource-adapter-name="activemq-rar.rar"/>
  <bean-instance-pool-ref pool-name="mdb-strict-max-pool"/>
</mdb>

In addition, define the MDB pool:

<pools>
	<bean-instance-pools>
		<strict-max-pool name="slsb-strict-max-pool" max-pool-size="20" 
             instance-acquisition-timeout="5" 
             instance-acquisition-timeout-unit="MINUTES"/>
		<strict-max-pool name="mdb-strict-max-pool" 
		     max-pool-size="20" 
             instance-acquisition-timeout="5" 
             instance-acquisition-timeout-unit="MINUTES"/>
	</bean-instance-pools>
</pools>

The final standalone.xml configuration should look like:

<server ...>
    ...
    <profile>
        ...
        <subsystem xmlns="urn:jboss:domain:ejb3:...">
            ...
            <mdb>
                <resource-adapter-ref resource-adapter-name="activemq-rar.rar"/>
                <bean-instance-pool-ref pool-name="mdb-strict-max-pool"/>
            </mdb>
            <pools>
                <bean-instance-pools>
                    <strict-max-pool name="slsb-strict-max-pool" 
                         max-pool-size="20" 
                         instance-acquisition-timeout="5" 
                         instance-acquisition-timeout-unit="MINUTES"/>
                    <strict-max-pool name="mdb-strict-max-pool" 
                         max-pool-size="20" 
                         instance-acquisition-timeout="5" 
                         instance-acquisition-timeout-unit="MINUTES"/>
                </bean-instance-pools>
            </pools>
            ...
        </subsystem>
        ...
    </profile>
    ...
</server>

A-MQ ports/transport-connectors

First, the A-MQ configuration requires the transport connectors that define the endpoint used by JBoss EAP to integrate the resource adapter.

Implement the following configuration in the activemq.xml:

<transportConnectors>
   <transportConnector name="openwire-client" 
        uri="nio://0.0.0.0:[BROKER_PORT]?[TRANSPORT_OPTIONS]"/>
</transportConnectors>

Summary

This article provides a detailed description of Red Hat JBoss EAP 7 integration with A-MQ 6.3 and the admin-object configuration, which is a complex process if the required steps are not clear for the integrator. This article covers the admin-object setup and the pool-name attribute in great detail and provides a good hint regarding the correct configuration.

Share

The post How to integrate A-MQ 6.3 on Red Hat JBoss EAP 7 appeared first on RHD Blog.

Red Hat Application Development I: Programming Java EE (JB183) course now available

$
0
0

The Red Hat Training team is very pleased to announce the release of our latest video classroom course, Red Hat Application Development I: Programming Java EE (JB183). JB183 is the preparatory course for the Red Hat Certified Enterprise Application Developer Exam (EX183). This video classroom course is available now as part of the Red Hat Learning Subscription or as a separate a la carte purchase.

In this course, veteran instructor Will Dinyes guides you through enterprise Java development with easy-to-follow lectures and demonstrations. JB183 is designed for students with a strong understanding of Java SE and object-oriented programming who want to learn how to begin developing modern enterprise applications on Red Hat JBoss Enterprise Application Platform (JBoss EAP) 7.0.

Will introduces the following concepts and topics:

  • Generating multi-tiered Java EE applications
  • Packaging and deploying Java EE applications
  • Creating Enterprise Java Beans, including message-driven beans
  • Managing persistence
  • Creating REST services with JAX-RS
  • Implementing Contexts and Dependency Injection
  • Creating messaging applications with JMS
  • Securing Java EE applications with JAAS

For those who are entering the workforce or just starting a career in Java EE development, this course will provide the necessary foundation for developing and contributing to enterprise Java applications. Further, this course prepares students for the Red Hat Certified Enterprise Application Developer Exam (EX183). If you pass the exam, you become a Red Hat Certified Enterprise Application Developer. This certificate is the first step to becoming a Red Hat Certified Architect.

Visit Red Hat Learning Subscription or contact me to learn more about the course.

Share

The post Red Hat Application Development I: Programming Java EE (JB183) course now available appeared first on RHD Blog.

Modernize your application deployment with Lift and Shift

$
0
0

For many software modernization projects, it’s all about learning to love, lift, and shift. No, wait. It’s all about learning to love lift and shift. The basic idea behind lift and shift is to modernize how an existing application is packaged and deployed. Because it’s not about rewriting the application itself, lift and shift is typically quick to implement.

Modern development environments rely on containers for packaging and deployment. A modern environment also uses a continuous integration / continuous deployment (CI/CD) system that automatically builds, tests, and deploys an application whenever its source code changes.

As an example, consider an application built on J2EE and running as a set of virtual machines. Repackaging the application as a set of containers and deploying them in a platform-as-a-service lets you use tools like Red Hat OpenShift, Kubernetes, and Istio service mesh to manage those containers. Within that architecture, a modular app server like Red Hat JBoss Enterprise Application Server (JBoss EAP) is perfect for container and cloud deployments. In addition, you can set up a CI/CD pipeline so that any future changes to the application are built and deployed automatically. Finally, you can use modern techniques such as canary deployments or blue/green deployments to roll out the changes into production.

Or, let’s say you’ve got a multi-tiered application, with each tier running on a different physical server. With lift and shift, you create a container for each tier. Those containers have the code for the tier (the presentation layer, the business logic, the database, and so forth), configuration information, and the runtime libraries and other dependencies that the code needs. Once the containers are built and configured to work together, you can deploy them to a public, private, or hybrid cloud. As with the previous example, lift and shift lets you take advantage of new technologies by repackaging the application, not by changing it.

Lift and shift gives you access to state-of-the-art technologies when you deploy the application today and when you make changes to the application in the future.

An aside: the selfish perspective

Although moving your enterprise forward is the goal of your team, one of your most important personal responsibilities is keeping your skills current. Whether you’re trying to get ahead in your current job or trying to move ahead to a new one, you want your brain and your resume loaded with the latest technologies.

When you think about modernizing a legacy application, you probably envision long nights going through ancient code, learning the old languages and techniques that keep that legacy application running. With lift and shift, however, you don’t change the code of the app, you change how it’s packaged and deployed. You’ll actually build modern skills as you master containers and CI/CD. So if you’ve been assigned to a lift and shift project, be of good cheer.

(By the way, show that trusty enterprise app some respect. Legacy code is what makes sure your paycheck doesn’t bounce, your flight arrives safely, and that the sun comes up in the morning.)

Other approaches to application modernization

Before we go, we’ll take a quick look at two other approaches to modernization: Augmenting an application with new layers and Rewriting the application.

Augmenting the application, as the name implies, doesn’t involve changing the existing application. Instead, new layers are added on top of legacy code. For example, say you have an accounting system that includes credit card processing. It was developed in the early 2000s and works exactly as designed. If you wanted to use that same functionality in a new application (a mobile app, for example), you could create a layer that sits between the existing app and the new one. The added layer is typically nothing more than an adapter between the two applications, although in some cases the layer has business logic as well. The result of the new layer is that your legacy code effectively becomes part of the new application even though you didn’t make any changes to the legacy code.

Rewriting the application is the most extreme form of software modernization. The goal of rewriting is to create new components that replace and ultimately retire the existing application. This is the most expensive and time-consuming option, and replacing a critical legacy application can be extremely risky. For those reasons it can be difficult to justify this approach. Despite these drawbacks, there are times when rewriting is the best option, particularly if the legacy application is keeping your organization from being competitive. If your legacy application runs on an operating system or a hardware platform that is no longer supported, rewriting is probably your only option. Rewriting doesn’t happen in isolation, however. It is often used as the final phase of modernization after augmentation and/or lift and shift.

Getting started

A great way to get started is with the Red Hat Application Migration Toolkit, a collection of open-source tools that simplify application modernization and migration. It automatically analyzes your code and gives you actionable suggestions for moving your code from a legacy app server to a more modern architecture like JBoss EAP. See An introduction to Red Hat Application Migration Toolkit for an overview.

For more information

At this point, you’re no doubt tingling with excitement and wanting to know more about application modernization. Fortunately, Red Hat has years of experience and lots of resources based on the lessons we’ve learned helping customers move their organizations forward.

If you’d like to read more, the article Making old applications new again delivers an overview of modernization techniques, how they work, and how they’re best applied.

Share

The post Modernize your application deployment with Lift and Shift appeared first on RHD Blog.

Free Online Java EE Development Course From Red Hat Available Now

$
0
0

The Red Hat Training team is pleased to announce the release of Fundamentals of Java EE Development. This free training is hosted by our partner edX. edX is an open online course provider that now hosts three Red Hat courses, including Fundamentals of Red Hat Enterprise Linux and Fundamentals of Containers, Kubernetes, and Red Hat OpenShift. 

Enterprise Java (Java EE is now known as Jakarta EE) is one of the most in-demand and marketable programming platforms. With Fundamentals of Java EE Development, students learn the foundational skills needed to develop modern applications. Serving as an introduction to enterprise Java development using Red Hat Developer Studio and Red Hat JBoss Enterprise Application Platform, this course builds on students’ Java SE skills to teach the basic concepts behind more advanced topics such as microservices and cloud-native applications.


In this course, veteran instructor Will Dinyes guides students through enterprise Java development with easy-to-follow lectures and demonstrations. In addition, students are guided through transforming a simple Java SE command line application into an enterprise application. The final application includes various Java EE specifications, including Enterprise Java Beans, Java Persistence API, and JAX-RS for REST services.

This free course is based on our full-length Java EE Development course Red Hat Application Development I: Programming in Java EE (JB183). If you are interested in learning more about that course, visit Red Hat Learning Subscription or contact me.

Share

The post Free Online Java EE Development Course From Red Hat Available Now appeared first on RHD Blog.


How to integrate a remote Red Hat AMQ 7 cluster on Red Hat JBoss EAP 7

$
0
0

It is very common in an integration landscape to have different components connected using a messaging system such as Red Hat AMQ 7 (RHAMQ 7). In this landscape, usually, there are JEE application servers, such as Red Hat JBoss Enterprise Application Platform 7 (JBoss EAP 7), to deploy and run applications connected to the messaging system.

This article describes in detail how to integrate a remote RHAMQ 7 cluster on a JBoss EAP 7 server, and it covers in detail the different configurations and components and some tips to improve your message-driven beans (MDBs) applications.

Overview

The messaging broker embedded in JBoss EAP 7 is ActiveMQ Artemis, a community project created from the union of HornetQ and Apache ActiveMQ projects, and it is the base of the RHAMQ 7. The result of this union is a high-performance messaging system for both platforms with the best features of both projects and with some smart new features.

JBoss EAP 7 features an embedded Apache ActiveMQ Artemis server as its JMS broker to provide Java EE messaging capabilities and it is configured in the messaging-activemq subsystem. This subsystem defines the operations and functions for this embedded broker.

However, it is very common to deploy RHAMQ 7 as an external clustered messaging platform to be used from different types of applications. JBoss EAP 7 connects to any messaging provider using a Java Connector Architecture (JCA) Resource Adapter. JBoss EAP 7 includes an integrated Artemis resource adapter.

The integrated Artemis resource adapter could be configured to connect to a remote installation of RHAMQ 7, which then becomes the JMS provider for your JBoss EAP 7 applications. This allows JBoss EAP 7 to be a client for the remote RHAMQ 7 server.

The Artemis resource adapter integrated with JBoss EAP 7 has the following limitations:

  • Dynamic creation of queues and topics: It does not support dynamic creation of queues and topics in the RHAMQ 7 broker. You must configure all queue and topic destinations directly on the remote RHAMQ 7 broker.
  • Creation of connection factories: RHAMQ 7 allows connection factories to be configured using both the pooled-connection-factory and the external-context; there is a difference in the way each connection factory is created. Only the pooled-connection-factory can be used to create connection factories in JBoss EAP 7. The external-context can be used only to register JMS destinations, which are already configured on the remote RHAMQ 7 broker, into the JNDI tree of the JBoss EAP 7 server so that local deployments can look them up or inject them. Only connection factories created by configuring the pooled-connection-factory element are supported for use when connecting to the remote RHAMQ 7 broker.

The communication between JBoss EAP 7 and RHAMQ 7 requires you to set up:

  • RHAMQ 7 brokers
  • JBoss EAP 7 servers

This article supposes an RHAMQ 7 HA cluster is deployed with at least three master brokers. It is not within the scope of this article to describe how to deploy a high availability (HA) RHAMQ 7 cluster; however, if you want to learn more, the Automating AMQ 7 High Availability Deployment article could help you.

RHAMQ 7 configuration

The Artemis resource adapter that is included with JBoss EAP 7.1 uses the ActiveMQ Artemis JMS Client 1.5.5. This client requires anycastPrefix and multicastPrefix prefixing on the address. It also expects the queue name to be the same as the address name.

<acceptors>
     <acceptor name="netty-acceptor">tcp://localhost:61616?anycastPrefix=jms.queue.;multicastPrefix=jms.topic.</acceptor>
</acceptors>

JBoss EAP 7 configuration

JBoss EAP 7 includes a default configuration for the messaging-activemq subsystem with the full or full-ha configuration. The default configuration does not include how to connect to a remote server. So to set it up, use the following steps:

  • Define the remote socket bindings to connect to each RHAMQ 7 broker deployed in its cluster:
/socket-binding-group=standard-sockets/remote-destination-outbound-socket-binding=messaging-remote-broker01:add(host=BROKER01,port=61616)
/socket-binding-group=standard-sockets/remote-destination-outbound-socket-binding=messaging-remote-broker02:add(host=BROKER02,port=61616)
/socket-binding-group=standard-sockets/remote-destination-outbound-socket-binding=messaging-remote-broker03:add(host=BROKER03,port=61616)
  • Define new remote connectors in the messaging-activemq subsystem:
/subsystem=messaging-activemq/server=default/remote-connector=messaging-remote-broker01-connector:add(socket-binding=messaging-remote-broker01)
/subsystem=messaging-activemq/server=default/remote-connector=messaging-remote-broker02-connector:add(socket-binding=messaging-remote-broker02)
/subsystem=messaging-activemq/server=default/remote-connector=messaging-remote-broker03-connector:add(socket-binding=messaging-remote-broker03)
  • Define a new pooled connection factory called activemq-rar.rar. Note that we are using a list of connectors and we activate the HA property:
/subsystem=messaging-activemq/server=default/pooled-connection-factory=activemq-rar.rar:add(entries=["java:/RemoteJmsXA", "java:jboss/RemoteJmsXA"],connectors=["messaging-remote-broker01-connector", "messaging-remote-broker02-connector", "messaging-remote-broker03-connector"],ha=true)
  • Define some extra properties, for example, user, password, and rebalance-connections between each connector (so it will avoid connecting only to one member of the cluster):
/subsystem=messaging-activemq/server=default/pooled-connection-factory=activemq-rar.rar:write-attribute(name=user,value=user)
/subsystem=messaging-activemq/server=default/pooled-connection-factory=activemq-rar.rar:write-attribute(name=password,value=s3cr3t)
/subsystem=messaging-activemq/server=default/pooled-connection-factory=activemq-rar.rar:write-attribute(name=rebalance-connections,value=true)
  • Define a new external context to declare the Queues and Topics in the RHAMQ 7 cluster. This step will define a local JNDI entry to connect to the remote resources:
/subsystem=naming/binding=java\:global\/remoteContext:add(binding-type=external-context, class=javax.naming.InitialContext, module=org.apache.activemq.artemis, environment=[java.naming.factory.initial=org.apache.activemq.artemis.jndi.ActiveMQInitialContextFactory, queue.SampleQueue=SampleQueue, topic.SampleTopic=SampleTopic])
/subsystem=naming/binding=java\:\/queue\/SampleQueue:add(lookup=java:global/remoteContext/SampleQueue,binding-type=lookup)
/subsystem=naming/binding=java\:\/topic\/SampleTopic:add(lookup=java:global/remoteContext/SampleTopic,binding-type=lookup)
  • As an optional step, you could modify the default resource adapter defined in the EJB 3 subsystem from the default one (activemq-ra) to the newly defined one (activemq-rar.rar). With this change, all your MDB instances will be connected to the broker using it:
<mdb>
    <resource-adapter-ref resource-adapter-name="${ejb.resource-adapter-name:activemq-rar.rar}"/>
    <bean-instance-pool-ref pool-name="mdb-strict-max-pool"/>
</mdb>
  • The new pooled connection factory has statistics disabled; do the following to activate them if you want to monitor how it is working at runtime:
/subsystem=messaging-activemq/server=default/pooled-connection-factory=activemq-rar.rar:write-attribute(name=statistics-enabled,value=true)
  • Do the following to see the statistics:
/subsystem=messaging-activemq/server=default/pooled-connection-factory=activemq-rar.rar:read-resource(include-runtime=true)

Tips to improve your MDB applications

Some literature describes the use of MDBs as an anti-pattern for consuming messages in the latest application designs; however, MDBs are often used in Java EE applications. The use of MDBs can be improved in a JBoss EAP 7 environment and—with a high-performance broker such as RHAMQ 7—you could get high levels of throughput by following some tips.

MDBs are a special kind of stateless session beans. They implement a method called onMessage that it is triggered when a JMS destination on which an MDB is listening receives a message. That is, MDBs are triggered by the receipt of messages from a JMS provider (resource adapter), unlike stateless session beans where methods are usually called by EJB clients. MDBs process messages asynchronously.

However, the number of MDBs instantiated could be defined by the following:

  • Resource adapter definition
  • Bean instance pool definition
  • Pool definition of the resource adapter
  • Resource adapter–specific properties

The combination of these features will help you to define how many instances of MDBs will be managed by JBoss EAP 7 and thus improve the throughput of your messaging system.

Resource adapter definition

In some cases, we need to define some different pooled connection factories. In such a case, we could define in the MDB which resource adapter to use by using the @org.jboss.ejb3.annotation.ResourceAdapter annotation:

@ResourceAdapter("activemq-rar.rar")
@MessageDriven(
    name = "SampleMDB",
    mappedName = "queue/SampleQueue",
    activationConfig = {
        @ActivationConfigProperty(propertyName = "destination", propertyValue = "SampleQueue"),
        @ActivationConfigProperty(propertyName = "destinationType", propertyValue = "javax.jms.Queue"),
        @ActivationConfigProperty(propertyName = "acknowledgeMode", propertyValue = "Auto-acknowledge")
    }
)
public class SampleMDB implements MessageListener {

This annotation is provided by the Maven jboss-ejb3-ext-api artifact that can be added to your Maven project, as follows:

<!-- EJB3 Extension -->
<dependency>
    <groupId>org.jboss.ejb3</groupId>
    <artifactId>jboss-ejb3-ext-api</artifactId>
    <version>2.2.0.Final-redhat-1</version>
    <scope>provided</scope>
</dependency>

Bean instance pool definition

JBoss EAP 7 can cache EJB instances in a bean instance pool to save initialization time. MDB instances are located in the default pool definition called mdb-strict-max-pool. If you have a large number of MDB definitions or you want to split them into different pools, you could create different bean instance pools, as follows:

/subsystem=ejb3/strict-max-bean-instance-pool=mdb-sample-pool:add(max-pool-size=100,timeout=10,timeout-unit=MILLISECONDS)

Pool definition of the resource adapter

You can set a specific instance pool that a particular bean will use by using the @org.jboss.ejb3.annotation.Pool annotation: 

@Pool("mdb-sample-pool") 
@MessageDriven(
    name = "SampleMDB",
    mappedName = "queue/SampleQueue",
    activationConfig = {
        @ActivationConfigProperty(propertyName = "destination", propertyValue = "SampleQueue"),
        @ActivationConfigProperty(propertyName = "destinationType", propertyValue = "javax.jms.Queue"),
        @ActivationConfigProperty(propertyName = "acknowledgeMode", propertyValue = "Auto-acknowledge")
    }
)
public class SampleMDB implements MessageListener {

Resource adapter–specific properties

By default, in JBoss EAP 7, each MDB can have up to 16 sessions, where each session processes a message. You can change this value by using a resource adapter–specific property to align with the application requirements.

maxSession is the property to define a different number of sessions managed by the MDB. When increasing the size of the maxSession attribute on a MDB, it is important to make sure that the value is not greater than the value of max-pool-size in the MDB pool size. If it is, there will be idle sessions since there will not be enough MDBs to service them. It is recommended that both values be equal.

The MDB definition should be similar to this:

@Pool("mdb-sample-pool") 
@MessageDriven(
    name = "SampleMDB",
    mappedName = "queue/SampleQueue",
    activationConfig = {
        @ActivationConfigProperty(propertyName = "destination", propertyValue = "SampleQueue"),
        @ActivationConfigProperty(propertyName = "destinationType", propertyValue = "javax.jms.Queue"),
        @ActivationConfigProperty(propertyName = "acknowledgeMode", propertyValue = "Auto-acknowledge"),
        @ActivationConfigProperty(propertyName = "maxSession", propertyValue = "100")
    }
)
public class SampleMDB implements MessageListener {

Monitoring your MDBs

To confirm the status of your MDBs, this CLI command will help you:

/deployment=SampleMDB.jar/subsystem=ejb3/message-driven-bean=SampleMDB:read-resource(include-runtime=true)

Summary

This article provided a detailed description of JBoss EAP 7 integration with an RHAMQ 7 cluster broker and subsytem configuration, and it provided some extra tips about how to improve your MDB applications.

If you are looking for more details, please refer to the following links:

Share

The post How to integrate a remote Red Hat AMQ 7 cluster on Red Hat JBoss EAP 7 appeared first on RHD Blog.

Streamline your JBoss EAP dev environment with Red Hat CodeReady Workspaces: Part 1

$
0
0

It has been just one month since the announcement of the release of Red Hat CodeReady Workspaces 1.0.0 Beta. Because the cloud/browser-based IDE may be full of promises, developers are usually suspicious, considering them as toys for occasional coders but not suitable for software craftsmen. But you’ll quickly see that Red Hat’s offering can be a good companion for building tailor-made environments.

The goal of this two-part series is to give a walk-through of using Red Hat CodeReady Workspaces to develop a Java EE (now Jakarta EE) application using Red Hat JBoss Enterprise Application Platform (JBoss EAP). I’ll give you details on how to bring your own tools, configure your workspace with helpful commands for JBoss EAP, and share everything so you can easily onboard new developers.

Red Hat CodeReady Workspaces

Red Hat CodeReady Workspaces is built on the Eclipse Che open source project and offers:

  • Centralized configuration management of development workspaces
  • Secured access to the development environment with source code that may remain on the central server, not the developer’s laptop
  • Extensible configuration allowing you to bring your own tools and reuse the runtimes you’ll use in production
  • A rich, browser-based development experience including auto-completion, navigation, debuggers, and easy sharing through the factory concept

The entire product runs on a Red Hat OpenShift cluster (on-premises or in the cloud), so there’s nothing to install on your machine. The installation instructions give details on how to set up everything on your OpenShift cluster; installation is done through an Ansible PlayBook Bundle running on the cluster Ansible Service Broker. Although it makes extensive use of containers technology for installation, defining your stacks, and configuring your workspaces, it is not exclusively dedicated to the development of applications running as containers. That’s what I’m trying to demonstrate throughout this post.

So, have you’ve got your Red Hat CodeReady Workspaces set up? Let’s dive into this JBoss EAP tour!

Defining your custom stack

A Red Hat CodeReady Workspaces stack is the basic building block for workspaces: it includes everything you may need for compiling, testing, debugging, or packaging your app. Even though the Red Hat CodeReady Workspaces installation comes with default stacks for many technologies (Java, JBoss EAP, Spring Boot, NodeJS, Python, and so on), extending them and creating your own stack is a common practice. Stacks are based on one or many container images and as such, providing stacks is basically a matter of writing Dockerfiles and building images.

Some common use cases, imagine your organization uses self-signed certificates to access infrastructure or you have started working with containerized apps on OpenShift and find it convenient to also use the oc or the odo command-line tools. You may have to extend the default stacks-java:1.0.0.Beta1 provided by Red Hat—which already includes OpenJDK, JBoss EAP, and Maven—in order to add your custom CA certificate and the tools you need:

FROM registry.access.redhat.com/codeready-workspaces-beta/stacks-java:1.0.0.Beta1
ADD ca.crt /etc/pki/ca-trust/source/anchors/ca.crt
RUN sudo update-ca-trust
USER root
RUN echo yes | keytool -keystore /etc/pki/java/cacerts -importcert \
               -alias HOSTDOMAIN -file /etc/pki/ca-trust/source/anchors/ca.crt \
               -storepass changeit
RUN curl -LO https://github.com/openshift/origin/releases/download/v3.11.0/openshift-origin-client-tools-v3.11.0-0cbc58b-linux-64bit.tar.gz && \
         tar xvf openshift-origin-client-tools-v3.11.0-0cbc58b-linux-64bit.tar.gz
RUN mv openshift-origin-client-tools-v3.11.0-0cbc58b-linux-64bit/oc /usr/local/bin/oc && \
         chmod +x /usr/local/bin/oc

Once you have produced this Dockerfile and put your ca.crt file in same directory, you just have to build your image and push it into a container images registry that is made available to your OpenShift cluster.

$ docker build --tag lbroudoux/stacks-java:1.0.0.Beta2 .
$ docker push lbroudoux/stacks-java:1.0.0.Beta2

Above, I’ve put my image on docker.io and you may easily reuse mine for a quick test. Then, we may start building a custom Red Hat CodeReady Workspace stack from the administration console.

Click on the Stacks left menu and review the default stack. Then you just have to click the Add Stack button to make a modal dialog appear, asking you for a Recipe. For this article, we are going to create a single container stack, so just select the DOCKERIMAGE thumbnail and enter the name of the Docker image we previously created: docker.io/lbroudoux/stacks-jaba:1.0.0.Beta2.

After having verified that the image exists, we navigate to the form allowing you to configure your stack. So start by assigning it a Name and a Description.

Assigning a name and description to the stack

Scroll down to the Machines section. Here we have a single Machine and we decide to name it dev-machine. We can check that our machine will be based on the container image we provide and we may also adjust the number of resources that will be dedicated to this machine. There’s more info on the machine here.

Machines section

Scrolling down, we can check the Agents (or Installers) section. Agents allow you to activate specific features of the Eclipse Che IDE. Here, we’ll need the basic one for dealing with Java: being able to execute commands, opening a terminal, and interacting with the Workspace API. More info on installers is available here.

Installers section

Below that is a very important part of the stack configuration where you may define the different Servers that will expose your machine. A servers definition allows you to declare the network ports that will be exposed by your workspace and that your developers will use for interacting and connecting to the app. In the case of our JBoss EAP development environment, we’ll declare two ports:

  • Port 8080 will allow regular interaction with the JBoss EAP application server.
  • Port 8000 will be used for remote debugging the deployed application.

More info on servers is available here.

Servers section

The next section is related to Commands. Here we’re going to add a single command for building the whole project using Maven. We’ll add some other commands during our first tests of a new workspace. Commands are used to build, debug your app and interact with your server. More info on commands is here.

Commands section

Finally, you may end by adding a description for components embedded in your stack. These descriptions are pure informational components and help with tags to organize your stack within the repository.

Adding descriptions for components

Once you have finished editing these last sections, you may now save your stack for later use through JBoss EAP workspaces. You can also check that everything you’ve done is exportable as JSON and can be versioned and saved into a Git repository. Just click the Show button within the Raw Configuration section. Everything we’ve seen and done so far can be found in my github.com/lbroudoux/codeready-workspaces repository.

Starting a JBoss EAP workspace

Now that we have a stack to build on, we may create a new workspace. So from the dashboard or the Workspaces page of Red Hat CodeReady Workspaces, just click the Add Workspace button. Creating a workspace starts by giving it a Name and picking the stack we previously created, as shown below.

Creating a workspace

Workspaces are there for working on projects, so within the Projects section, be sure to add a new project. You can, for example, refer to one located on GitHub. I used github.com/lbroudoux/openshift-tasks, which is a JEE/JBoss EAP app I’ve used for demonstrating deployment on OpenShift, even though in our case, we’ll deploy the application to a regular, not containerized, JBoss EAP instance.

Adding a project

Leave untouched the other options and then create and run your workspace. In a few minutes, you should have a working IDE where a project has been cloned from GitHub and all the dev tools such as Java Language Server have started up into the dev-machine console.

Running the new workspace

Next steps

In this first part of the series, we have seen how to extend the Red Hat CodeReady Workspaces base image to include extra tooling and certificates. We have registered everything as a custom stack within the administration portal. Finally, we started a new workspace containing everything we need to code, compile, deploy, debug, and package our JEE/JBoss EAP application.

Read Streamline your JBoss EAP dev environment with Red Hat CodeReady Workspaces: Part 2 to see how to configure your workspace for the development tasks above. We’ll see how to make everything easily reproducible and distributable through Red Hat CodeReady Workspaces Factory.

Share

The post Streamline your JBoss EAP dev environment with Red Hat CodeReady Workspaces: Part 1 appeared first on Red Hat Developer Blog.

Streamline your JBoss EAP dev environment with Red Hat CodeReady Workspaces: Part 2

$
0
0

This is the second half of my series covering how to use Red Hat CodeReady Workspaces to develop a Java Enterprise Edition (now Jakarta EE) application using Red Hat JBoss Enterprise Application Platform (JBoss EAP) in the cloud on Red Hat OpenShift/Kubernetes. In the first part, we saw how to:

  • Bring your own tools by extending Red Hat’s provided stacks
  • Register your own stack within Red Hat CodeReady Workspaces
  • Create your workspace using your stack and embedding your JEE project located on a Git repository

For this second part, we’ll start configuring the workspace by adding some helpful settings and commands for building and running a JBoss EAP project. We’ll then see how to use the local JBoss EAP instance for deploying and debugging our application. Finally, we’ll create a factory so that we’ll be able to share our work and propose an on-demand configured development environment for anyone that needs to collaborate on our project.

Configuring your JBoss EAP workspace

In the previous article, we ended up with a workspace that was configured for Java but with some missing dependencies. An extra step is usually necessary: indicate that you’re dealing with a Maven project. This has to be done only once by the user that set up the workspace. For that, go to Project > Update Project Configuration and enable Maven under the JAVA section. Once that is done, an additional External Libraries item appears in your project tree. You can now open Java files and play around with code navigation, Java completion, and so on.

External Libraries

You should now be able to launch your first build command. Open the Commands Palette using Run > Commands Palette or the Shift+F10 shortcut. You’ll see the build command was defined when you created the workspace and you may double-click it to run it.

Build command

After a few seconds, you’ll see the successful build in the build command’s dedicated console.

Build command's console window

Nice! You can now start modifying code and do some refactoring. We’re able to edit code, compile it, and package it, but let’s see how to test it locally within our JBoss EAP instance.

Adding some JBoss EAP commands

Let’s start by adding a new command for starting the JBoss EAP instance that is included within our stack image. Looking just above the project tree view, you’ll find an icon on the right that allows you to open the commands management view. You’ll see that commands are categorized into BUILD, TEST, RUN, DEBUG, DEPLOY, and COMMON goals. In the RUN section, create a new Custom command that you’ll call start-eap and add the command below:

export JAVA_OPTS= && export JAVA_OPTS_APPEND=-Dsun.util.logging.disableCallerCheck=true && \
	/opt/eap/bin/standalone.sh -b 0.0.0.0

You can now launch this command through the Command Palette or through the Run blue arrow on the menu bar. The command is executed in its own console and you should see output like the following indicating that your JBoss EAP 7.1 instance is up and running.

JBoss EAP 7.1 instance is up and running

Now let’s deploy our application to the running instance. For that, let’s create a new command within the DEPLOY section and call it copy-war. Add the command below and execute it.

cp /projects/openshift-tasks/target/openshift-tasks.war /opt/eap/standalone/deployments/ROOT.war

This enables the previously built WAR archive to be deployed to our JBoss EAP instance’s deployments folder. The instance should now hot-deploy it in a few seconds. You may now want to check your application and play with it. Just right of the command console, click the + button and choose Servers. This will open a new view displaying the URL corresponding to the different servers attached to your workspaces. Remember the eap server we declared in the stack configuration? This information is used by Red Hat CodeReady Workspaces to create a new OpenShift route that allows you to access your deployed application!

Accessing the deployed application

Just copy and paste the URL into your browser and you should see our test application live.

For now, we just have created simple commands deploying a packaged WAR but you can also call some commands allowing you to work using an exploded directory structure and hot-reload of JSP and static resources. For example, I use the following build-dev command for initializing a directory structure within the deployment folder of the JBoss EAP instance:

mvn clean package -f ${current.project.path}/pom.xml && \
	mkdir /opt/eap/standalone/deployments/ROOT.war && \
	cp -R ${current.project.path}/target/openshift-tasks/* /opt/eap/standalone/deployments/ROOT.war/ && \ 
	touch /opt/eap/standalone/deployments/ROOT.war.dodeploy

And I use the following update-dev command to just refresh this directory and force a re-deploy of the application:

mvn -DskipTests package -f ${current.project.path}/pom.xml && \
	cp -R ${current.project.path}/target/openshift-tasks/* /opt/eap/standalone/deployments/ROOT.war/ && \
	touch /opt/eap/standalone/deployments/ROOT.war.dodeploy

Debugging

Red Hat CodeReady Workspace tooling can also be used for debugging your application. In order to do that, create a new command as usual within the DEBUG section. Let’s call it start-eap-debug and just put there the following command, including the debug flag and the port 8000 we have used within our stack definition:

export JAVA_OPTS= && export JAVA_OPTS_APPEND=-Dsun.util.logging.disableCallerCheck=true && \
	/opt/eap/bin/standalone.sh -b 0.0.0.0 --debug 8000

Now start the JBoss EAP instance using the debug mode. Before starting it up again, you may want to stop the running instance: you can achieve that by looking for the start-eap running process in the top EXEC menu bar and clicking the blue square. Your instance is now launched in debug mode and you have to launch a debug session within the IDE. Before doing so, remember that the Edit Debug Configurations item in the Run menu lets you configure a connection to a remote JBoss EAP instance using port 8000, as shown below.

Debug configuration

You can now start a debug session through the Run > Debug > Remote EAP menu item. The IDE connects to localhost:8000 and switches to the debug perspective. You can now open some Java class like /src/main/com/openshift/service/DemoResource.java file. Click on line 44 to place a breakpoint. Now go to the browser tab hosting your app and click the Log Info button; you should see the debug session starting in the workspace and filling up the Frames and Variables panels.

Frames and Variables panels

Sharing your work with a factory

Setting up everything was not that hard but it takes a little time and can be error-prone. Red Hat CodeReady Workspaces offers the concept of a factory in order to be able to reproduce and duplicate a workspace configuration. Using factories, you can easily onboard new collaborators for your project by making everything available with a single click!

Let’s create a factory for our workspace. From the Red Hat CodeReady Workspace dashboard, choose the Factories menu item on the left vertical menu, and then give your factory a name and select the Workspace you want to use as a basis. Choose CREATE and then explore the factory properties in the detail screen:

Factory properties

The most important attributes of a factory are its URLs, which can be used for launching a new workspace embedding all the configuration and commands we added to the original workspace. A URL may be combined with nice badges to offer instant access for any README or wiki page.

Just copy and paste one of the URLs into a browser tab or click a badge and you’ll see this nice crane animation building your own workspace on demand, allowing you to quickly starting collaboration on a new project.

Building a workspace

Now that your collaborator’s workspace is up and running, she can start coding and easily contributing pull requests to your original source code repository. But I’ll leave that topic for a later article.

Get started!

We have seen through this tour how Red Hat CodeReady Workspaces allow you to configure a development environment and easily replicate and distribute it among your organization. The embedded cloud/browser-based IDE provides everything you need to start quickly collaborating on projects while providing you security through centralization of source code and authentication of access. Red Hat CodeReady Workspaces gives you greater security and faster onboarding, and it ensures your code works on all your developers’ machines too.

Best of all, it’s easy to sign up for the beta. Visit the product page to get the code and everything you need to know about the product.

See also:


Share

The post Streamline your JBoss EAP dev environment with Red Hat CodeReady Workspaces: Part 2 appeared first on Red Hat Developer Blog.

Transitioning Red Hat SSO to a highly-available hybrid cloud deployment

$
0
0

About two years ago, Red Hat IT finished migrating our customer-facing authentication system to Red Hat Single Sign-On (Red Hat SSO). As a result, we were quite pleased with the performance and flexibility of the new platform. Due to some architectural decisions that were made in order to optimize for uptime using the technologies at our disposal, we were unable to take full advantage of Red Hat SSO’s robust feature set until now. This article describes how we’re now addressing database and session replication between global sites.

Lessons from our first deployment

Red Hat IT’s initial launch of multi-site SSO had each site completely independent of the other. While this facilitated the platform’s high uptime, it also resulted in a number of limitations hampering some new technologies.

The most problematic limitation was that active login sessions were stored only at a single site—the one where a user happened to authenticate. This meant that if that particular site had an outage, the user would have to reauthenticate upon redirection to another site. Reauthentication lead to a confusing and poor customer experience, especially during rolling site maintenance.

Furthermore, this architecture prevented the adoption of the OpenID Connect (OIDC) authorization code flow, regardless of it being fully supported in the Red Hat SSO product. The authorization code flow partially relies on server-to-server communication rather than on a user’s browser, as in the case of SAML or other OIDC flows. It was probable that the backend server request would not be routed to the same site that contained the active user session. This would result in the backend authorization code flow failing, leading to intermittent UI errors, at best.

Finally, other features of Red Hat SSO, such as offline OpenID Connect tokens and two-factor authentication (2FA) were simply unusable in this multi-site environment. By default, when a user associates an offline token or a new 2FA device with their account, Red Hat SSO persists this in the database. Without database replication between sites, this new association persists only in a single site, preventing the technology from correctly functioning in this environment.

Because of these and other issues, we knew that the next step forward would have to address database and session replication between sites.

Working toward our future multi-site solution

Working with the Red Hat SSO development team, the multi-site use cases and objectives were detailed. The team explored a number of potential solutions and ended up with the Cross-Datacenter Replication Mode.

Deploying Cross-Datacenter Replication Mode requires two major modifications to the existing architecture of a Red Hat SSO deployment. The first is migrating our database to Galera Cluster and the second is deploying Red Hat Data Grid (formerly known as Red Hat JBoss Data Grid).

Migrating to Galera Cluster

Red Hat SSO already supports a number of databases, but the cross-datacenter replication mode requires synchronous replication between sites, ensuring data integrity and consistency across the entire deployment. For example, new user registrations at site A need to be immediately available at sites B and C to prevent additional duplicate user registrations and conflicting database records.

As of Red Hat SSO 7.2, the two solutions that have been tested in conjunction with the cross-datacenter mode are Oracle Database 12c Release 1 (12.1) RAC and MariaDB server version 10.1.19 with Galera; Red Hat IT’s deployment is using MariaDB with Galera Cluster. Each of the three sites has a pair of MariaDB Galera servers, so even in the event of a single site outage, we can still maintain a quorum majority.

The SSO clusters were already leveraging MariaDB as the RDBMS, but multi-site active/active required switching the entire cluster to Galera for cross-datacenter mode. Initially, each of the three sites had a pair of multi-master database hosts. Upgrading SSO clusters to Galera without an outage involved rolling through sites. The standard MariaDB multi-master replication would be disabled on each site’s DB cluster, and then the remaining DB servers were added to the Galera cluster. Following this, the local Red Hat SSO nodes were updated to use the DB servers now part of the Galera cluster. Finally, the last DB server was reinitialized and added to the Galera cluster.

Migrating to Galera Cluster

This process was done so that we could perform the upgrade with zero downtime in any of our sites. This was made possible because the user data is handled by a distinct service and not mastered within Red Hat SSO. Had this not been true, the upgrade would have been more complicated. The Galera DB upgrade was done prior to implementing Red Hat Data Grid, so system performance could be closely monitored and backed out, if necessary.

Deploying Red Hat Data Grid

Red Hat SSO utilizes Infinispan for session storage, which comes bundled with Red Hat JBoss Enterprise Application Platform. Red Hat Data Grid is the Red Hat supported version of Infinispan and has a standalone server distribution that is used in conjunction with JBoss EAP’s Infinispan to replicate cache data across all sites. Red hat Data Grid has explicit support for Cross Datacenter Replication and offloading the replication concerns to a separate server helps minimize performance impact. Each Red Hat SSO instance is configured to use a local Red hat Data Grid cluster as a remote store for Infinispan. In turn, each Red Hat Data Grid cluster is aware of all the other Red Hat Data Grid clusters at the other sites. The Red Hat Data Grid clusters in each site form a grid, as the name implies, and replicate the SSO session cache among all sites. The Red Hat Data Grid data replication can be asynchronous, if you have an active/passive multi-site Red Hat SSO deployment, or synchronous for active/active deployments. Each of the Red Hat SSO sites has a three-node Red Hat Data Grid cluster, which ensures cross-site replication survives any single node failing.

Deploying Red Hat Data Grid required building net-new clusters of Red Hat Enterprise Linux servers. Red Hat SSO does not support concurrently running Red Hat Data Grid and SSO on the same servers, nor would you want to do this. Creating and configuring these hosts was straightforward following the basic setup steps, with a few minor modifications for our own purposes. One of the modifications was using a separate TCP stack—running on different ports for the local channel rather than using UDP, because some cloud providers don’t support multicast. Another modification was the use of asymmetric encryption and authentication, ensuring that user session data was encrypted and never exposed on the wire.

The configuration changes to the existing Red Hat SSO hosts followed the basic setup steps with little-to-no modifications. The cleanest way to deploy these changes in this environment was to bring down a single site entirely, stopping the Red Hat SSO service across all SSO servers within a site. Configurations were then updated and the Red Hat SSO service was brought back up one host at a time. This procedure ensured that all entries in the local cluster cache would be present in the Red Hat Data Grid cache. Otherwise, errors were occasionally encountered when starting hosts, because they could not reconcile local cache contents with the remote-store Red Hat Data Grid contents. Following this procedure, active sessions were lost on a rolling basis, but no customer-facing outage was incurred.

Deploying Red Hat Data Grid

Measuring and monitoring performance

There were some initial concerns about the performance and stability of cross-site synchronous replication—both on the database level, as well as on the application cache level. Sufficient monitoring had to be in place to create an alert if performance degrades.

JMXtrans Agent is very useful for taking metrics typically exposed only via JMX Infinispan cache performance, garbage collection, and memory/thread utilization and aggregating them in a tool like Graphite. In combination with collectd and the Graphite plugin, it was easy to snapshot all relevant host statistics. Moreover, combining this with Dropwizard Metrics for instrumentation of all Red Hat SSO customizations gives a comprehensive view into the complete stack.

Groovy scripts are also a great way to quickly leverage any attributes or operations exposed via a JMX MBean. For example, internally we utilize a number of Groovy scripts. These are tied into monitoring and reporting the status of the CacheContainerHealth component, monitoring the memory levels, and alerting if garbage collection isn’t able to reclaim sufficient space, as well as checking the cross-site replication status for all the configured caches. These result in quick action if servers are suddenly unavailable. Groovy scripts also make it simple to automate more-complex procedures, such as initiating state transfer between sites after recovery has completed.

In conclusion, Cross-Datacenter Replication Mode for Red Hat SSO allows Red Hat IT to scale its authentication systems globally while providing an extremely high level of resiliency and availability. By leveraging supported, open source technologies, Red Hat has built a true multi-site single sign-on authentication platform capable of handling next-generation applications.

Additional resources

About the Author

Jared Blashka is a Senior Software Applications Engineer on the Red Hat IT Identity and Access Management team.  He is a Red Hat Certified Engineer and has 8 years of experience, focusing on identity management, application lifecycle management, and automation.

Share

The post Transitioning Red Hat SSO to a highly-available hybrid cloud deployment appeared first on Red Hat Developer Blog.

Get started with Red Hat CodeReady Studio 12.12.0.GA and JBoss Tools 4.12.0.Final for Eclipse 2019-06

$
0
0

JBoss Tools 4.12.0 and Red Hat CodeReady Studio 12.12 for Eclipse 2019-06 are here and are waiting for you. In this article, I’ll cover the highlights of the new releases and show how to get started.

Installation

Red Hat CodeReady Studio (previously known as Red Hat Developer Studio) comes with everything pre-bundled in its installer. Simply download it from our Red Hat CodeReady Studio product page and run it like this:

java -jar codereadystudio-<installername>.jar

JBoss Tools or Bring-Your-Own-Eclipse (BYOE) CodeReady Studio requires a bit more.

This release requires at least Eclipse 4.12 (2019-06), but we recommend using the latest Eclipse 4.12 2019-06 JEE Bundle because then you get most of the dependencies pre-installed.

Once you have installed Eclipse, you can either find us on the Eclipse Marketplace under “JBoss Tools” or “Red Hat CodeReady Studio.”

For JBoss Tools, you can also use our update site directly:

http://download.jboss.org/jbosstools/photon/stable/updates/

What’s new?

Our main focus for this release was improvements for container-based development and bug fixing. Eclipse 2019-06 itself has a lot of new cool stuff, but I’ll highlight just a few updates in both Eclipse 2019-06 and JBoss Tools plugins that I think are worth mentioning.

Red Hat OpenShift

Red Hat OpenShift Container Platform 4 support

The new OpenShift Container Platform (OCP) 4 is now available (see this article) and is a major shift compared to OCP 3, but JBoss Tools is compatible with this major release in a transparent way. Just define your connection to your OCP 4 based cluster as you did for an OCP 3 cluster and use the tooling!

Server tools

Wildfly 17 server adapter

A server adapter has been added to work with Wildfly 17. It adds support for Java EE 8.

Hibernate Tools

New runtime provider

The new Hibernate 5.4 runtime provider has been added. It incorporates Hibernate Core version 5.4.3.Final and Hibernate Tools version 5.4.3.Final

Runtime provider updates

The Hibernate 5.3 runtime provider now incorporates Hibernate Core version 5.3.10.Final and Hibernate Tools version 5.3.10.Final.

Maven

Maven support updated to M2E 1.12

The Maven support is based on Eclipse M2E 1.12.

Platform

Views, dialogs, and toolbar

Import project by passing it as a command-line argument

You can import a project into Eclipse by passing its path as a parameter to the launcher. The command would look like eclipse /path/to/project on Linux and Windows, or open Eclipse.app -a /path/to/project on macOS.

Launch Run and Debug configurations from Quick Access

From the Quick Access proposals (accessible with Ctrl+3 shortcut), you can now directly launch any of the Run or Debug configurations available in your workspace.

Note: For performance reasons, the extra Quick Access entries are only visible if the org.eclipse.debug.ui bundle was already activated by some previous action in the workbench such as editing a launch configuration, or expanding the Run As…​ menus.

The icon used for the view menu has been improved. It is now crisp on high-resolution displays and also looks much better in the dark theme. Compare the old version at the top and the new version at the bottom:

High-resolution images drawn on Mac

On Mac, images and text are now drawn in high resolution during GC operations. You can see crisp images on high-res displays in the editor rulers, forms, etc. in Eclipse. Compare the old version at the top and the new version at the bottom:

Table/Tree background lines shown in dark theme on Mac

In dark theme on Mac, the Table and Trees in Eclipse now show the alternating dark lines in the background when setLinesVisible(true) is set. Earlier, they had a gray background even if line visibility was true.

Example of a Tree and Table in Eclipse with alternating dark lines in the background:

Equinox

When the Equinox OSGi Framework is launched, the installed bundles are activated according to their configured start-level. The bundles with lower start-levels are activated first. Bundles within the same start-level are activated sequentially from a single thread.

A new configuration option equinox.start.level.thread.count has been added that enables the framework to start bundles within the same start-level in parallel. The default value is 1, which keeps the previous behavior of activating bundles from a single thread. Setting the value to 0 enables parallel activation using a thread count equal to Runtime.getRuntime().availableProcessors(). Setting the value to a number greater than 1 will use the specified number as the thread count for parallel bundle activation.

The default is 1 because of the risk of possible deadlock when activating bundles in parallel. Extensive testing must be done on the set of bundle installed in the framework before considering enabling this option in a product.

Java Development Tools (JDT)

Java 12 support

Change project compliance and JRE to 12

A quick fix Change project compliance and JRE to 12 is provided to change the current project to be compatible with Java 12.

Enable preview features

Preview features in Java 12 can be enabled using Preferences > Java > Compiler > Enable preview features option. The problem severity of these preview features can be configured using the Preview features with severity level option.

Set Enable preview features

A quick fix Configure problem severity is provided to update the problem severity of preview features in Java 12.

Add default case to switch statement

A quick fix Add ‘default’ case is provided to add default case to an enhanced switch statement in Java 12.

Add missing case statements to switch statement

A quick fix Add missing case statements is provided for an enhanced switch statement in Java 12.

Add default case to switch expression

A quick fix Add ‘default’ case is provided to add default case to a switch expression.

Add missing case statements to switch expression

A quick fix Add missing case statements is provided for switch expressions.

Format whitespaces in ‘switch’

As Java 12 introduced some new features into the switch construct, the formatter profile has some new settings for it. The settings allow you to control spaces around the arrow operator (separately for case and default) and around commas in a multi-value case.

The settings can be found in the Profile Editor (Preferences > Java > Code Style > Formatter > Edit…​) under the White space > Control statements > ‘switch’ subsection.

Split switch case labels

As Java 12 introduced the ability to group multiple switch case labels into a single case expression, a quick assist is provided that allows these grouped labels to be split into separate case statements.

Java Editor

In the Java > Editor > Code Mining preferences, you can now enable the Show parameter names option. This will show the parameter names as code minings in method or constructor calls, for cases where the resolution may not be obvious for a human reader.

For example, the code mining will be shown if the argument name in the method call is not an exact match of the parameter name or if the argument name doesn’t contain the parameter name as a substring.

Show number of implementations of methods as code minings

In the Java > Editor > Code Mining preferences, selecting Show implementations with the Show References (including implementations) for → Methods option now shows implementations of methods.

Clicking on method implementations brings up the Search view that shows all implementations of the method in sub-types.

Open single implementation/reference in editor from code mining

When the Java > Editor > Code Mining preferences are enabled and a single implementation or reference is shown, moving the cursor over the annotation and using Ctrl+Click will open the editor and display the single implementation or reference.

Additional quick fixes for service provider constructors

Appropriate quick fixes are offered when a service defined in a module-info.java file has a service provider implementation whose no-arg constructor is not visible or is non-existent.

Template to create Switch Labeled Statement and Switch Expressions

The Java Editor now offers new templates for the creation of switch labeled statements and switch expressions. On a switch statement, three new templates: switch labeled statement, switch case expression, and switch labeled expression are available as shown below. These new templates are available on Java projects having compliance level of Java 12 or above.

If switch is being used as an expression, then only switch case expression and switch labeled expression templates are available as shown below:

Java views and dialogs

Enable comment generation in modules and packages

An option is now available to enable/disable the comment generation while creating module-info.java or package-info.java.

Improved “create getter and setter” quick assist

The quick assist for creating getter and setter methods from fields no longer forces you to create both.

Quick fix to open all required closed projects

A quick fix to open all required closed projects is now available in the Problems view.

New UI for configuring Module Dependencies

The Java Build Path configuration now has a new tab, Module Dependencies, which will gradually replace the options previously hidden behind the Is Modular node on other tabs of this dialog. The new tab provides an intuitive way for configuring all those module-related options, for which Java 9 had introduced new command-line options, such as --limit-modules, etc.

The dialog focuses on how to build one Java Project, here org.greetings.

Below this focus module, the left-hand pane shows all modules that participate in the build, where decorations A and S mark automatic modules and system modules, respectively. The extent of system modules (from JRE) can be modified with the Add System Module… and Remove buttons (corresponds to --add-modules and --limit-modules).

When a module is selected in the left-hand pane, the right-hand pane allows to configure the following properties for this module:

Read module:

Select additional modules that should be accessible from the selected module (corresponds to --add-reads).

Expose package:

Select additional packages to be exposed (“exports” or “opens”) from the selected module (corresponds to --add-exports or --add-opens).

Patch with:

Add more packages and classes to the selected module (corresponds to --patch-module).

Java Compiler

Experimental Java index retired

Eclipse 4.7 introduced a new experimental Java index which was disabled by default.

Due to lack of resources to properly support all Java 9+ language changes, this index is no longer available, starting with Eclipse 4.12.

The preference to enable it in Preferences > Java is removed and the old index will be always used.

Note: Preferences > Java > Rebuild Index button can be used to delete the existing index files and free disk space.

Debug

‘Run to Line’ on Ctrl+Alt+Click in annotation ruler

A new shortcut, Ctrl+Alt+Click, has been added to the annotation ruler that will invoke the ‘Run to Line’ command and take the program execution to the line of invocation.

Content assist in Debug Shell

Content assist (Ctrl+Space) support is now available in the Debug Shell.

Clear Java Stack Trace Console usage hint on first edit

The Java Stack Trace Console shows a usage hint when opened the first time. This message is now automatically removed when the user starts typing or pasting a stack trace.

Lambda variable names shown in Variables view

The Lambda variable names are now shown in the Variables view while debugging projects in the workspace.

JDT developers

Support for new Javadoc tags

The following Javadoc tags are now supported by the compiler and auto-complete.

Tags introduced in JDK 8:

@apiNote

@implSpec

@implNote

Tags introduced in JDK 9:

@index

@hidden

@provides

@uses

Tags introduced in JDK 10:

@summary

And more…​

You can find more noteworthy updates on this page.

What is next?

Having JBoss Tools 4.12.0 and Red Hat CodeReady Studio 12.12 out we are already working on the next release for Eclipse 2019-09. Stay tuned for more updates.

Share

The post Get started with Red Hat CodeReady Studio 12.12.0.GA and JBoss Tools 4.12.0.Final for Eclipse 2019-06 appeared first on Red Hat Developer Blog.

Viewing all 64 articles
Browse latest View live